The quest for a full featured Linux experience on a tablet
I recently fulfilled a dream of mine that I let stay a dream for too long – I bought a tablet PC which can run a full desktop operating system on a normal CPU architecture.
From as far back as my first time shopping for a laptop as a grammar school student, I can remember being impressed by the (at the time, thick and clunky) “tablet” laptops which could accept pen\stylus input. The type of computer that would run Windows XP Tablet PC Edition. These were far more expensive than conventional laptops at the time, and way out of my price range.
I spent the years, perhaps over a decade that followed chasing this idea of mobile computing. From my Palm i705, to my HP iPAQ H1910, to the Cassiopeia running Windows CE 1.0 that I found at a garage sale, to the many iPads I have bought throughout the past decade… but I’d never owned anything that quite scratched that itch for a truly mobile full desktop experience.
I steered clear of Microsoft Surface for a long time, in no small part because of the (in my opinion) disastrous initial launch where many of them contained ARM processors and only pretended to be full featured computers… tricking non-savvy consumers by running something which resembled Windows, but couldn’t run most Windows programs due to the CPU architecture.
Recently, after AT&T took away the grandfathered iPad unlimited data plan I had for nearly a decade, I felt a new freedom to explore what was out there in the tablet market. By now, it seems that a bit more is available out there with full desktop capabilities in a tablet form factor, but it still for some reason seems to be a very niche type of product.
I found the Chuwi UBook X, which had a very similar look and feel as a Microsoft Surface tablet, but seemed to be significantly cheaper for better hardware specs. I was intrigued, especially as I discovered that there is a large community of people out there running Linux on their Microsoft Surface tablets. I decided to give the UBook a try and picked one up.
Linux on the UBook
The Windows experience out of the box on the UBook was very impressive. I found the screen auto rotation and on screen keyboard to be close to as intuitive as what I was accustomed to from my years of iPad usage. The voice dictation and keyboard autocorrect\predictive text was also fairly solid. Windows 11 on the tablet is definitely a pleasant user experience. Pleasant enough that I am keeping it intact, and my attempts to get Linux working so far have been as a dual boot.
I tested several different distributions and desktop environments, curious to see how some of the ones I was accustomed to running on my desktops were working with mobile support. Unsurprisingly, traditional desktops found in Linux Mint distributions like MATE and Cinnamon were basically unusable on mobile out of the box. I’m sure you could make it work with heavy modification, but lacking even the basics like an on screen keyboard, these desktop UI’s were clearly not going to be my picks on this device.
I tested Ubuntu 22.04, which by default comes with a GNOME desktop interface. I found this to be competent and usable on the tablet, so finally we were getting somewhere! But, despite the interface claiming to have auto screen rotation capabilities, I found that my tablet would never exit landscape mode.
In search for a solution, I found that a lot of folks are running Fedora 39 on this type of hardware. Fedora 39 comes with GNOME out of the box too, but with a bit of a better default configuration for my preferences, such as eliminating the Ubuntu sidebar. Fedora is also a much more bleeding edge distribution, offering newer kernels and drivers, which is often helpful when you are running newer or more niche hardware like this.
I installed Fedora 39 and immediately it felt like it belonged on this device, except for one problem… the screen still didn’t rotate!
Troubleshooting Linux automatic screen rotation and accelerometers
So, I am now faced with the reality that a newer kernel and drivers won’t save me. My accelerometer doesn’t seem to work, whether I’m running a 5.x or 6.x kernel, whether I’m on Ubuntu or Fedora… but why? I found reports from other people online saying their accelerometer was working on their UBook, but with some other issues, like the screen rotation being 90 degrees off.
I began to research, consuming content like this video about how to fix flipped screen rotation on Linux, in an effort to learn more about how these accelerometers worked and why mine didn’t work… It seemed like this must be a lower level issue than just GNOME not working, so I wanted to find out how the drivers from these sensors work and how to troubleshoot them.
I first learned of the monitor-sensor command, which seemed to be a lower level way to debug what was happening. Upon running this command, my screen orientation was always reporting “left-up”, regardless of the actual position of the tablet.
Still not sure about where the disconnect was here, I dove deeper. The monitor-sensor output talks about “iio-sensor-proxy“, so what does that do? I learned that the actual hardware for the accelerator in Linux is handled by a subsystem called Industiral I/O (IIO).
I further learned that their device handles are named like “iio:device#” in /dev/. I soon found my accelerometer sensor located in “/dev/iio:device0” and learned that its raw readings are available in the path “/sys/bus/iio/devices/iio:device0/”.
This finding led to an interesting discovery, the raw values were not always exactly the same each Linux distribution I tested, but they seemed to be unchanging while being observed. They were not updating when the tablet was rotated physically.
I dove deeper into the driver support, and found that while my accelerometer was an MXC6655, support for this accelerometer had been added to the kernel previously through the MXC4005 driver. I even dug up the original messages on the mailing list where this took place. I could see in my lsmod that the MXC4005 driver was, in fact, the active one. This was supposedly a working driver for this model of accelerometer, so, why didn’t it work?
I concluded that I must be some kind of driver issue and a fairly low level problem, so armed with my knowledge so far, I decided to open a bug report. Since this seemed to be not specific to any distribution, I went straight to Linux itself and submitted a bug report on the Kernel bug tracker.
Bug report and further troubleshooting
With my bug report now open, I was very humbled by the immediately helpful responses I received. I’ve had many past experiences in open source communities and forums over the years where my very detailed questions receive no response, or receive incomplete or rude responses which are generally unhelpful.
Working with the kernel.org bug tracker contributors was, in contrast, far more pleasant and helpful than any support experience I can think of, even when working with support departments for major enterprise products.
It was a very humbling experience, and I am definitely glad to know there are so many great people working on the Linux kernel. Everyone I worked with there provided just enough information on what they wanted me to do or test or collect data from, offered more assistance if I needed it, and made me feel like my (honestly, relatively unimportant) bug was something they were going to get to the bottom of.
I will cover some of the basic steps and process that went into the troubleshooting here, but if you want to see the actual dump data and actual exchanges, you can read further on the actual bug report: https://bugzilla.kernel.org/show_bug.cgi?id=218578
The first step was dumping some data from the ACPI tables to a file and extract the accelerometer related information.
# cat /proc/acpi/dsdt > dsdt.dat
# iasl -d dsdt.dat
The above process creates a second file in your working directory, called “dsdt.dsl”, which is a lot more human readable. I proceeded to open that in a text editor and find and extract the accelerometer related information.
It was at this point that someone who read my detailed report asked me an interesting question I hadn’t considered. Essentially, they called me out on saying I was “rebooting” a lot, and asked what I meant by “reboot” and if I had tried a cold start from a powered off state.
Admittedly, this was not something which I’d really ever given any prior thought to. I knew that Windows had a “fast startup” feature which caused it to save some state data so it could boot faster next time. But outside of this fact, it hadn’t really occurred to me that on a modern computer there would be any functional difference between powering it off and “rebooting”. Especially when transitioning between operating systems, like rebooting Windows, and selecting Fedora from a GRUB menu.
To my shock, when I began to test things from a cold start, the accelerometer actually started working. Evidently, this had something to do with why I was finding reports online from other people with the same hardware who said it was working. They likely weren’t trying to do anything as fancy as I was, and were not dual booting these tablets, so they weren’t “rebooting” as much as I was. Anyone who was fully powering down their computer every time they started up next time, would have been blissfully unaware of the issue I was facing. But, because I was constantly testing things by installing and then rebooting straight out of a live environment, or rebooting straight out of Windows into a live USB, I was very often not cold booting the machine. And when I was cold booting the machine, it was usually into a live USB to install a new Linux distribution to test, and with the keyboard attached so I could run the installer… thus, when I did cold boot, I wasn’t trying to rotate the tablet.
With this new information in hand, I continued with the information gathering. I gathered some information to find the DSDT node which is being used on the tablet, under the instruction of the helpful contributor who was now handling my bug ticket.
# ls -l /sys/bus/i2c/devices/
i2c-MXC6655:00 -> ../../../devices/pci0000:00/0000:00:15.0/i2c_designware.0/i2c-0/i2c-MXC6655:00
# cat /sys/bus/i2c/devices/i2c-MXC6655\:00/firmware_node/path
\_SB_.PCI0.I2C0.ACC0
I also collected information from “acpidump” and “dmesg” which was just simply dumped onto the bug report ticket for further analysis.
The next instructions I was given were to install i2c-tools, which opened up a whole other world of troubleshooting I didn’t know was possible. I was instructed to take some I2C dumps: one of a good working accelerometer state after a cold boot and another after a warm reboot where the accelerometer didn’t work.
i2cdump -y -f -r 0-15 0 0x15 > i2dcump.txtEven more interesting, I was given a command to reset the accelerometer manually!
i2cset -y -f 0 0x15 0x01 0x10So, I needed to generate a third dump. After the warm reboot where the accelerometer did not work, and I had generated that dump, I was to reset the accelerometer and take a third dump to show the state afterwards.
To my amazement, the reset command actually brought my dead accelerometer back to life right in front of my eyes, and I took the third i2c dump and attached them all.
After collecting all of this data, the contributor helping me determined that the driver did not always reset the accelerometer chip, and sometimes the chip came up with a bit register set incorrectly and putting the chip in “power-down” mode. The solution seemed simple enough, the driver would be patched to add the reset command to the probe() method of the driver, so when the driver probed the accelerometer, this bit would get reset back to the correct value if it was wrong.
This led me to bring up the possibility of the same thing happening while coming out of a sleep power state (which was also occurring in my testing), and since the same reset was correcting that condition, we would also include a reset of the chip after resume from standby in the patch.
The patch and testing
To my excitement, I soon received a bug ticket update asking me to test an experimental kernel with the new driver included. I had never done anything like this before, but I received these instructions along with a few other links:
Generic Fedora kernel test instructions
=======================================

1. Create a folder to save the kernel rpms into
2. Download the:
    kernel-core-<version>.x86_64.rpm
    kernel-modules-<version>.x86_64.rpm
    kernel-modules-core-<version>.x86_64.rpm
   files from the provided koji link into the created folder
3. From the folder run: "sudo rpm -ivh --oldpackage kernel*.rpm"
4. Remove any manual configuration you've done to work around the bug, such as
   kernel cmdline changes in grub config files, or /etc/modprobe.d/*.conf files
5. Note test kernels are not signed so you need to disable secureboot if you
   have it enabled
5. Reboot, press ESC / F1 / F2 (machine specific) to enter your BIOS setup
   to disable secure-boot if necessary
6. Select the new kernel (should be selected by default) and boot into the new
   kernel
7. Verify you've removed any special kernel commandline options by doing:
   "cat /proc/cmdline" and checking they are not there
8. Test if the bug is now fixed
9. Report the testing-results back in bugzilla
My test kernel was to be kernel-6.7.10-200.bz218578.fc39, and was available to me to download from the Fedora build system. There was also now a mailing list discussion going to work on getting this patch implemented in the kernel code base once I had tested it.
I followed the instructions and installed the experimental kernel, and the problems with my accelerometer seemed to be completely solved! 🙂 The accelerometer worked on cold boots, warm boots, and even when coming off of a sleep state!
At this point, I am not sure which kernel update will have the patched driver… and I know it will take a longer time for the patched kernel to trickle down to other distributions like Ubuntu and Linux Mint, but hopefully in the meantime if someone is having the same problem, they will find something in this write-up helpful, and they’ll know that a patch is on the way… in the meantime, they can always manually reset the accelerometer if they need to.
Many thanks to the contributors who helped with the kernel bug ticket! It was a pleasure working with you. 🙂
Accelerometer orientation problems
There was still one other issue which was unrelated to my bug report ticket. The accelerometer orientation was wrong. When the screen rotated, it was usually upside down from the actual orientation of the tablet for me. Some people said it was off by 90 degrees? I feel like mine was off by 180 degrees. I’m not sure if that was really a difference or if people were misremembering or misspeaking about their angles… regardless… I had done some manual stuff to get this resolved through the course of my troubleshooting, and it led me down some completely different rabbit holes.
I had been told to add a rule to /etc/udev/hwdb.d/ containing the following:
sensor:modalias:acpi:MXC6655*:dmi:*:svnCHUWIInnovationAndTechnology*:pnUBookX:*
 ACCEL_MOUNT_MATRIX= 0, -1, 0; -1, 0, 0; 0, 0, 1
My initial attempts to do this were weirdly unsuccessful. Given the other problems I was having with the accelerometer, this was difficult to troubleshoot for awhile since I was somewhat working on both issues concurrently.
- I did not realize at first that files in /etc/udev/hwdb.d/ must have the “.hwdb” extension. Some other extension, like “.conf” will not work in this location.
- When the information was communicated to me, it was poorly formatted by the website where it was posted, and I did not realize that there should be a single SPACE before ACCEL_MOUNT_MATRIX.
So despite the fact I was copying and pasting this straight from someone who said it worked for them, initially it didn’t for me. It did finally work once I figured out the missing space and file extension issues.
I also learned the proper way to reload this configuration without fully rebooting the system. A lot of the older posts out there do not do this through systemd, so I eventually came across this method which seemed to do the trick.
# systemd-hwdb update && udevadm triggerThis configuration reload process was actually instrumental to me figuring out why the configuration I had wasn’t working, as without the space before ACCEL_MOUNT_MATRIX, I received an error: “Property expected, ignoring record with no properties”. This eventually led me to realize my file was formatted improperly, a fact which was obscured to me before when I was just rebooting to try to apply my changes.
Now that I had this working, and my accelerometer was fully functioning as expected, I wanted to try to get this updated for other people too so that one day with the updated kernel these UBook tablets will just work correctly straight on a fresh install of any distribution.
With the help of the bug tracker contributors, I was led to the actual hwdb file on the systemd GitHub: https://github.com/systemd/systemd/blob/main/hwdb.d/60-sensor.hwdb
To my shock, almost this exact line existed on the hwdb list already. The existing code looked like this:
# Chuwi Ubook X (CWI535)
sensor:modalias:acpi:MXC6655*:dmi*:svnCHUWIInnovationAndTechnology*:pnUBookX:*
 ACCEL_MOUNT_MATRIX=0, -1, 0; -1, 0, 0; 0, 0, -1
Maybe it shouldn’t have, but it actually took a side-by-side comparison in a text editor for me to figure out what was wrong with this.
It was missing a colon!
This led to my first GitHub pull request to a real open source project. I submitted a pull request to systemd to fix the missing colon so this hwdb entry would work for others in the future.
Now, the official code in the systemd codebase is correct and matches what is in my hwdb override file:
# Chuwi Ubook X (CWI535)
sensor:modalias:acpi:MXC6655*:dmi:*:svnCHUWIInnovationAndTechnology*:pnUBookX:*
 ACCEL_MOUNT_MATRIX=0, -1, 0; -1, 0, 0; 0, 0, -1
So, one day future UBook owners won’t have to worry about this anymore.
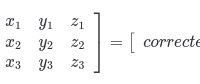
What does ACCEL_MOUNT_MATRIX actually do?
Before I realized why my configuration file was not working (because I had no output, I could just see there was no change to the behavior) I dove a bit into ACCEL_MOUNT_MATRIX, what it really does, and what the values really mean. I want to elaborate on this a bit here too, as I didn’t find this to be immediately obvious, and in fact, it seems to never really be discussed accompanying the various recommendations I found posted by people to use various values for this.
I found a good authoritative source on this which I wanted to share in this write-up. It comes from the iio-sensory-proxy documentation, and can be found here.
The ACCEL_MOUNT_MATRIX is used to correct accelerometer orientation issues, essentially giving you a way to override the values if the accelerometer is not mounted in the same orientation the software expects. This part is fairly obvious, but wasn’t obvious to me at first was exactly how it works.
In my first callback to high school math classes I’ve had in awhile, I learned that this is essentially using matrix multiplication to adjust the accelerometer values.

So, hopefully this additional information will give some context if you are reading this and need to formulate your own accelerometer mount matrix to correct an accelerometer for which the work has not already been put in to create this.
Once you wrap your head around it, you can see that it’s just some simple math to flip and invert values as needed.
Where my Linux UBook is now
This has been a truly fascinating journey for me, I feel like I barely scratched the surface with this lengthy write-up. It has provided some valuable insights for me into how lower level drivers for these type of devices work, and given me some firsthand experience in how Linux kernel bugs are reported and eventually patched. It has also given me a new appreciation for the incredibly intelligent people who are hanging around the Linux kernel bug tracker with the knowledge to troubleshoot these type of issues at an expert level. If you feel like this write-up was over your head and highly technical, you understand the level of amazement I have at the technical knowledge that goes into these efforts.
I am now comfortably running Fedora 39 on my UBook and I will continue to keep the patched kernel installed and available on my GRUB menu, so I can hopefully continue to use it until the patch goes into the real Fedora 39 kernel mainline. In the meantime, I will continue to experiment with Linux on my tablet.
There are still a few things about the Linux experience on this tablet I am not fully satisfied with yet, and I feel like this will not be the last technical write-up on my journey to solve my problems.
A few more outstanding things I want to work on:
- I would like to get a graphical boot loader working with touch screen support, so that I can select my Windows or Linux boot using only the touch screen. I have been experimenting with rEFInd, but their touch support does not currently seem to work with the UBook touch screen. This may be my next “bug report rabbit hole” after I find some time for further testing.
- I am not entirely satisfied with the Intel graphics performance on Fedora. For most uses it is good enough, but I noticed that 4K and 1440P YouTube videos are struggling on my Fedora install, where they playback effortlessly in Windows. It sounds like the Intel graphics drivers may ship with some “not optimized for performance” defaults, even on bleeding edge kernels. My next stop will be threads like this one which make some suggestions I haven’t tried yet.
- It was brought to my attention that the built-in webcams don’t work on Linux yet, and I have confirmed this to be the case as well. There is an existing StackExchange post about this from another UBook user, so far with no replies. It looks like the webcams are Intel IPU3 CIO2 devices, and they may not work the same way as other webcam video sensors (they may not output normal RGB or YUV data, and it may be a raw Bayer sensor). I might look into this further too.
All in all, these are minor things to me, and I will be using Linux on a more regular basis on this tablet now that I have the accelerometer working.
I’ll likely continue to run Fedora 39. I like the GNOME interface on this tablet, even though I am not very fond of some of their UI decisions when I am running it on a real desktop. I think GNOME is the best “desktop experience” out there for a Linux tablet right now.
KDE Plasma Mobile was also brought to my attention, and I have installed this as well, so that I can toggle back and forth between this and GNOME on my login screen. So far, KDE Plasma Mobile seems to be even more tablet optimized than GNOME. To me though, the interface almost feels a bit “too” mobile… it feels more like using an Android tablet than a Linux one. GNOME may be a bit better suited to my tastes, but there are a few things I like on KDE Plasma slightly better, like I feel that I can type more accurately on their on-screen keyboard.
I will continue experimenting and hopefully will have more knowledge to share in another write-up in the future. 🙂


Recent Comments