Background
I have a three server Proxmox cluster in my lab, where I cheaped out on the OS drives. I bought 1TB Silicon Power SSD’s, because they were cheap, and I have generally had no issues with using these off brand SSD’s as boot drives. I figured they were just OS drives anyway, so using a ZFS Mirror would be sufficient redundancy and would be fine for my use case.
Unfortunately, these cheap SSD’s don’t seem to play nice with ZFS. They are constantly getting kicked out of the ZFS pool for no reason across all 3 hosts. I have seen some similar reports of compatibility issues with a variety of SSD models, and it seems like it is an unresolvable issue. I either use different SSD’s or I stop using ZFS. As a result, I decided to replace them with some Crucial MX500 1TB SSD’s, and simply copy my ZFS volume over to those. I thought it should be simple enough to replace each mirror member in the zpool and rebuild.
However, upon buying those, I realized that they were not quite the same size. For some reason, my cheap Silicon Power SSD’s were actually 1.02TB in size, according to Smart hardware information. Therefore, it was not possible to clone the entire disk in a straightforward way, such as with DD or CloneZilla, because the destination disks were very slightly smaller than the source disks.
I didn’t want to do a fresh reinstall, since I already had many VM’s on this cluster, and not only that, but it is a hyperconverged CEPH cluster, so there would have been a lot of configuration to rebuild here. I didn’t want to have to resilver the whole CEPH storage volume or figure out how to get a fresh install to join back to my cluster. I was looking for an easy solution.
In order to get all of the steps tested and documented, I created a VM with two 100GB virtual disks and installed Proxmox (inside the VM) in order to give myself a test environment. I then proceeded to add two 50GB virtual disks and started experimenting.
Obviously, no one would ever install Proxmox this way for any reason other than testing, but for the purposes of the steps being taken here, whether the machine is bare metal or not doesn’t matter.
I’m creating this write-up partially for myself for when I complete this on my real hypervisors, so the screenshots and references in this article will be referencing those small virtual disks, as the article was written off of my VM proof of concept, however, I did complete the same steps successfully on my real hypervisors afterwards.
This guide may not be comprehensive, and may not be the best methods to do this process, but this is what I was able to synthesize from the disjointed posts and guides I found online, and these steps worked reliably for me. As always, make sure to have backups before you begin messing around with your production operating systems.
Assumptions and Environment
For the purposes of this guide, the partition layout is the default one when you install Proxmox from the Proxmox 7 ISO with ZFS Mirror on to two disks. This creates three partitions: A BIOS_Grub partition, A boot\ESP partition, and the actual ZFS data partition. The only partition which is actually mounted on the hypervisor during normal operation is the ZFS one, but the other two are required for boot.
While performing all of the work outlined in this guide, I booted to the Proxmox 7 install ISO, hit Install Proxmox so the installer would boot (but never ran the installer, of course), then hit CTRL+ALT+F3 to summon a TTY and did the work from the console. I figured this was a quick and dirty way to get a roughly similar environment with the ZFS components already installed and ready to go.
I did create a test virtual machine in my virtual Proxmox environment to make sure that any VM’s stored on the ZFS volume would be copied over, however this was not critical to my production run since all of my VM disks are on my CEPH storage.
If you want to do this process yourself, make sure that your new disks have sufficient disk space to accommodate the actual disk usage on your ZFS volume.
Copy the Partition Layout and Boot Loader Data
The first part of the process here will be to copy over the partition layout.
Normally, I would copy partition tables from one disk to another using the “sfdisk” command, however I found that this did not work due to the differently sized disks. So, it was necessary to do the work manually.
The Proxmox install CD does not have Parted installed, but it is simple enough to install from the console.
# apt update
# apt install parted -y
Once Parted is installed, we can review the current partition layout. In my environment, my original install disks were /dev/sda and /dev/sdb. The new (half-sized) disks are /dev/sdc and /dev/sdd.
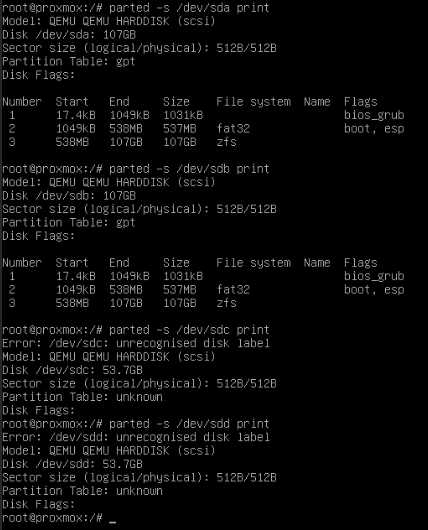
Here, you can see the partition layout which was created by the installer. We will need to manually copy this layout to the new disks, along with the flags.
I went ahead and manually created the same partitions on /dev/sdc using Parted.
You can see the full sequence of commands in the below screenshot, essentially I simply opened the device with:
# parted /dev/sdcThen I initialized a GPT partition table on the device.
(parted) mklabel gptThen I used the mkpart command (following the prompts on the screen) to create the partitions.
(parted) mkpartFor the first two partitions, I copied the start and end positions exactly.
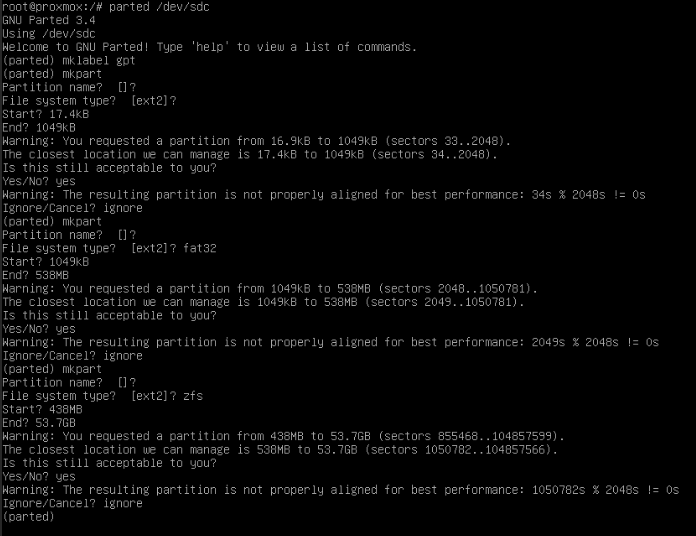
Note that when making the last partition (the actual ZFS data partition), I used the capacity of the disk as shown by parted for my “end” point of the partition.
I ignored the partition alignment errors, as I did want to keep the partitions exactly the same.
Now, we have a matching partition table, but still need to set the flags. Also, partition 1 shows an ext2 filesystem which shouldn’t be there (and isn’t really there), but this will be resolved later.
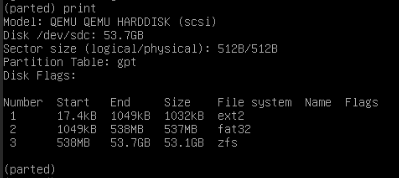
Next, we need to set the partition flags.
(parted) toggle 1 bios_grub
(parted) toggle 2 esp
(parted) toggle 2 boot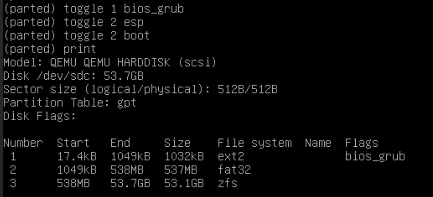
I found that after doing this, the flags on partition 2 didn’t show up until I ran “toggle 2 boot” a second time.
(parted) toggle 2 bootPerhaps it was already toggled on by default (but not shown that way?), nonetheless, this did the trick.
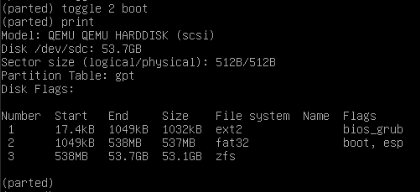
Now, we have a solid partition table on /dev/sdc. We can repeat these steps on /dev/sdd, or if you want to make life simpler, we can simply copy the data with sfdisk.
Sfdisk is not installed on the Proxmox installer ISO either, but it’s easy enough to install, it is part of the “fdisk” package.
# apt install fdisk -yWith it now installed, we can simply copy the partition layout with Sfdisk.
# sfdisk -d /dev/sdc | sfdisk -f /dev/sdd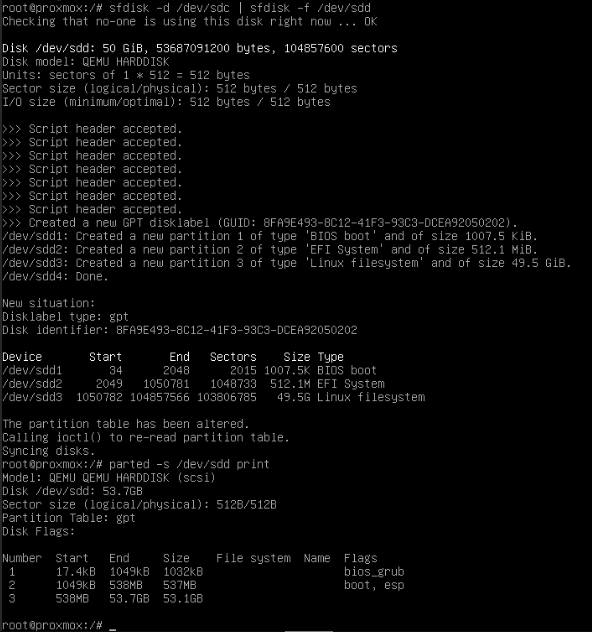
As you can see above, we now have the identical partitions on /dev/sdd. We couldn’t do this from the original disks because they were a different size.
Next, we still need to copy over our boot loader data to partitions 1 and 2, as they currently have no data on them. I will use DD to copy the data from partitions 1 and 2 on my old disks /dev/sda and /dev/sdb to the same partitions on /dev/sdc and /dev/sdd (my new disks).
# dd if=/dev/sda1 of=/dev/sdc1 status=progress
# dd if=/dev/sda2 of=/dev/sdc2 status=progress
# dd if=/dev/sdb1 of=/dev/sdd1 status=progress
# dd if=/dev/sdb2 of=/dev/sdd2 status=progress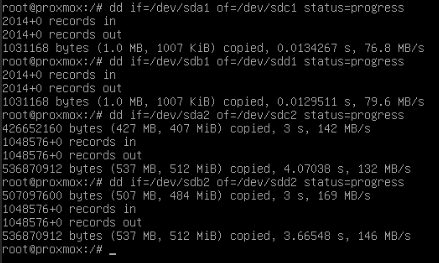
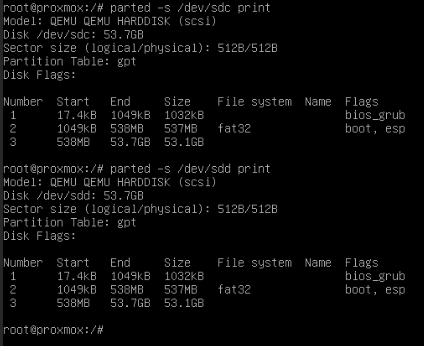
As you can see, with this data copied over, the filesystem residue in Parted is now gone as well.
Create a New ZFS Mirror, And Copy The Data
We’ve now copied over all of our boot loader and partitions, but we still do not have a ZFS volume to boot off of, nor any of our data.
We are still booted to the Proxmox installer CD, accessing the console on TTY3.
As you can see, currently no ZFS volume is live. We can simply import the existing one, which by default is called “rpool”.
If you aren’t sure yours is called “rpool” and you want to verify that, you can follow this process.
# zpool importThis will show you your available pools to be imported. As you can see below, mine is named “rpool”. You will need to import the pool with the -f option, as it was previously used on another system so the mount needs to be forced.
# zpool import rpool -f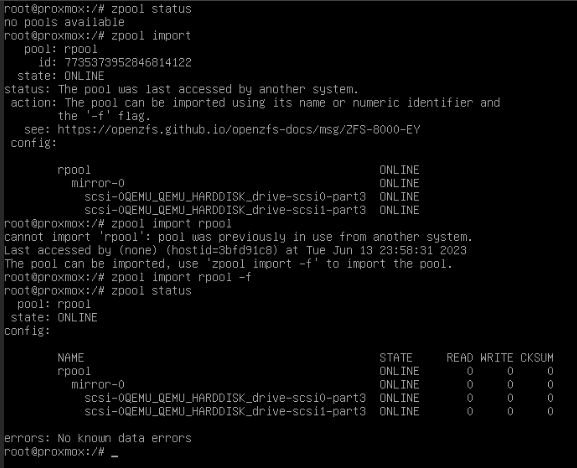
The above screenshot should clarify the process, and why the -f flag is needed.
Now that our pool is mounted, we should see our filesystems when we run:
# zfs list
In my case, we see a zpool/ROOT/pve-1, which is our root filesystem for the Proxmox install. We can also see some zpool/data volumes for my test virtual machines. Yours may differ, but likely only by showing different VM volumes, etc, which is not important for our next steps.
Now we need to create a new ZFS pool on our new disks to house this data. I will name the pool “pve” so that I don’t have to deal with two pools named “rpool” (we can rename it later).
You can see on my earlier zpool status screenshot that Proxmox by default uses the disk ID’s for the ZFS configuration, rather than direct device paths like /dev/sdc. I will find my available paths and their corresponding device mappings by running:
# ls -la /dev/disk/by-id/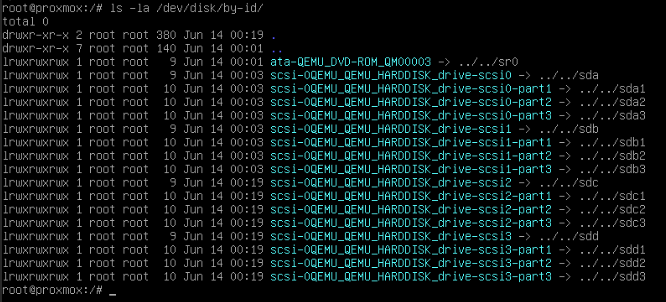
I want to create a ZFS mirror (RAID 1) like what I had before, but named “pve” instead of “rpool”, so the command to do that will be:
# zpool create pve mirror /dev/disk/by-id/scsi-QEMU_QEMU_HARDDISK_drive-scsi2-part3 /dev/disk/by-id/scsi-QEMU_QEMU_HARDDISK_drive-scsi3-part3You can see in the above screenshot that these are the same as /dev/sdc3 and /dev/sdd3, our ZFS data partitions we created in Parted.
Now, you can see in “zpool status” that our old and new pools both exist.
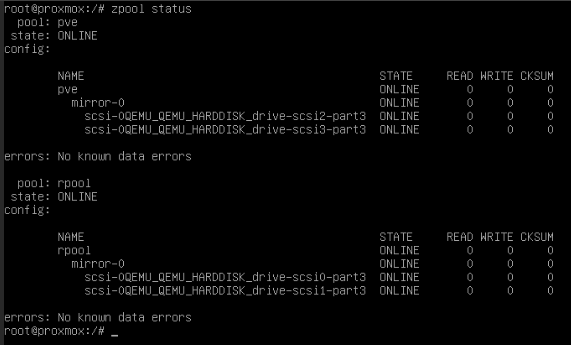
However, the new pool does not have any data on it yet. In order to copy the data, I will use ZFS snapshots.
We will first create a snapshot of our existing volume “rpool”, called “migration”:
# zfs snapshot -r rpool@migrationNext, we will copy the data to our new volume “pve”.
# zfs send -R rpool@migration | zfs receive -v pve -FAs you can see in this screenshot, you need to use the -F with the zfs receive so that it will overwrite the existing (empty) volume.
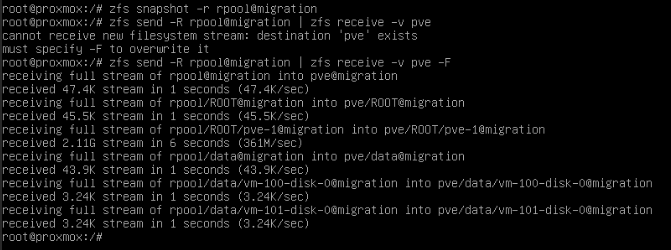
You can now confirm through “zfs list” that our data shows up on both volumes.
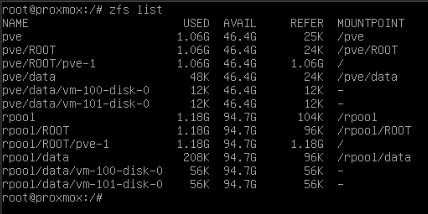
At this point in time, to ensure data integrity, I decided to shut down the machine and remove the two old drives. This way, we know that we won’t make a mistake and delete our original copy of the data, and we won’t have to deal with two ZFS pools by the same name. Once the disks are removed, I rebooted back into the Proxmox installation ISO again and went back to TTY3 to continue working. Perhaps this is overly cautious, but I think it is likely the best practice here.
Now that we are booted again, we can confirm that the only ZFS volume that remains is the newly created “pve” one by running “zpool import”. Note that this did not actually mount or import any volume, because as before, it thinks it was used by another system.
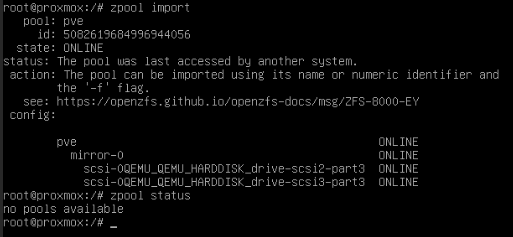
Now, we want to rename the volume to “rpool” again, so that the volume name did not change, as this may have consequences.
To do that, we will simply import the pve volume and rename it to rpool, then export it again.
First, let’s import it and check that it is now named rpool.
# zpool import pve rpool -f
# zpool status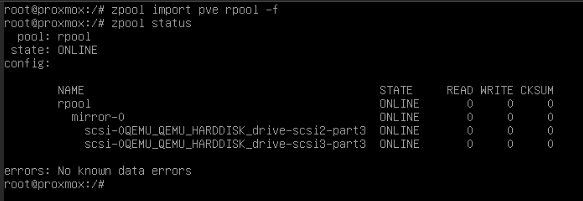
As you can see, it is, so we’ll simply export it now.
# zpool export rpoolNo screenshot needed here since there was no output. Now we should be done with the data manipulation part.
Reinstall the Boot Loader
Since our disk ID’s have changed, in order to ensure that our next boot and subsequent ones will be successful, we can reinstall the boot loader.
Note that since I removed the original disks, the new disks are now /dev/sda and /dev/sdb.
# zpool import rpool
# zfs set mountpoint=/mnt rpool/ROOT/pve-1
# mount -t proc proc /mnt/proc
# mount -t sysfs sys /mnt/sys
# mount -o bind /dev /mnt/dev
# mount -o bind /run /mnt/run
# chroot /mnt/
# update-grub
# grub-install.real /dev/sda
# grub-install.real /dev/sdb
# exit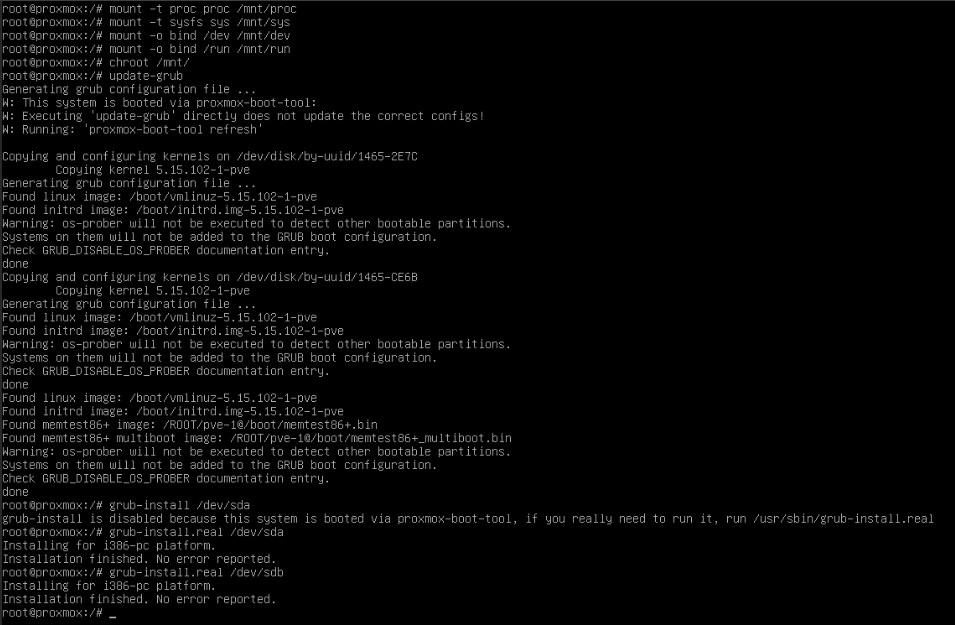
Now we can go ahead and reboot, attempting to boot off of one of our new disks.
First Reboot
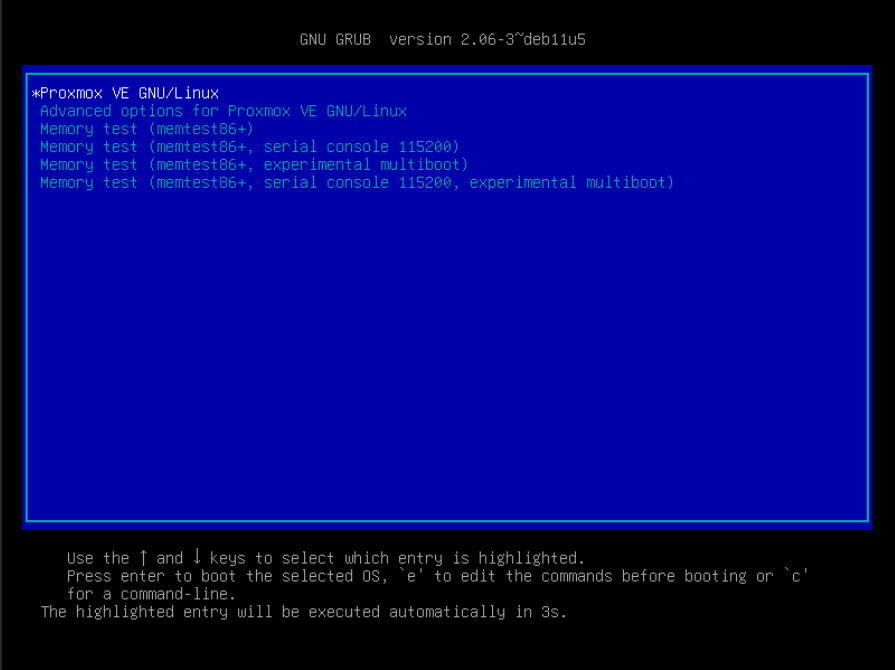
On the first reboot, we are going to run into the familiar error stating that the ZFS pool was previously used on another system. This will cause our system to drop to an (initramfs) prompt.
It’s no problem, we can simply run “zpool import rpool -f” from this prompt, then reboot our system again.
# (initramfs) zpool import rpool -f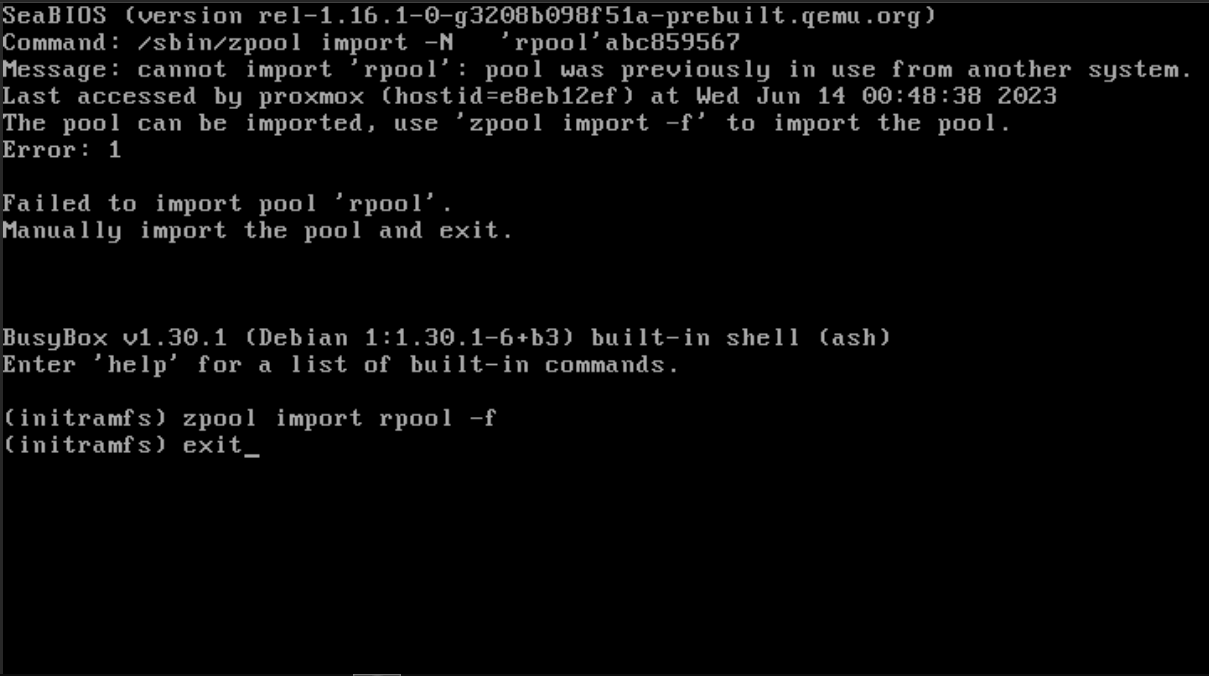
Our next boot subsequently, we might receive an error because we changed the root mountpoint earlier while using our chroot environment. Again, no worries, we can simply change it back, and reboot again.
(initramfs) set mountpoint=/ rpool/ROOT/pve-1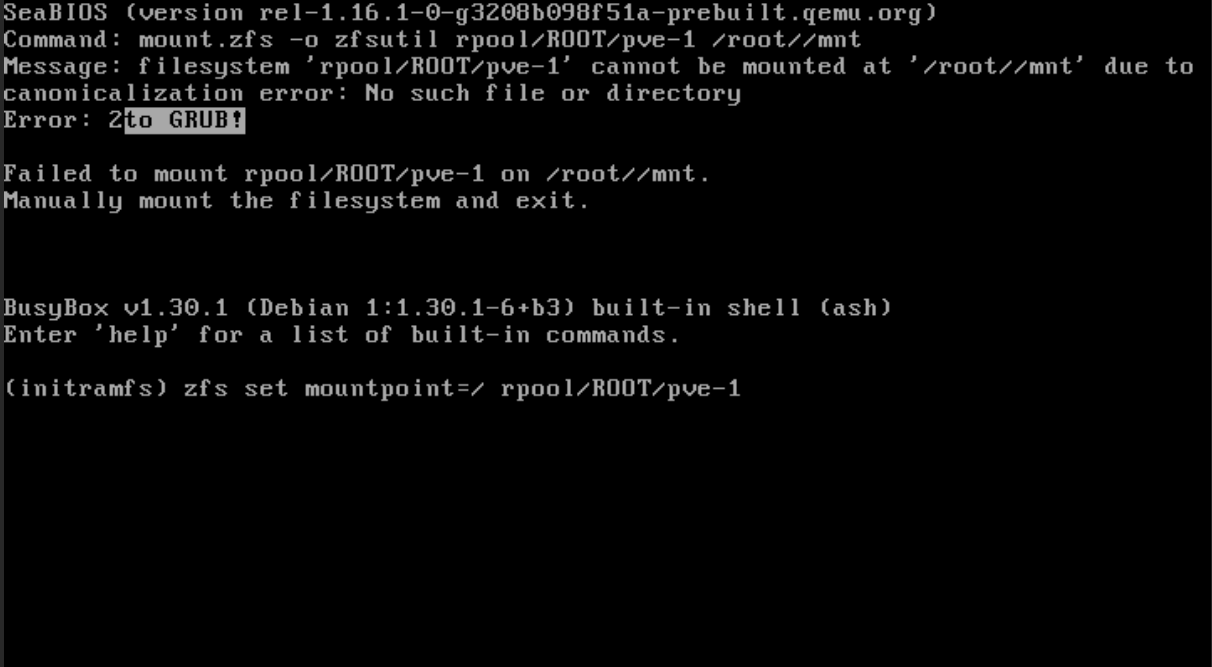
Following this, we should be all done! Our system has now booted normally, and should continue to do so.
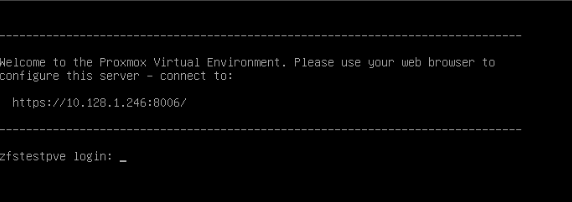
If we explore in the web UI, we can see that our VM’s still exist, and our new 50GB storage is live on the local ZFS volume.
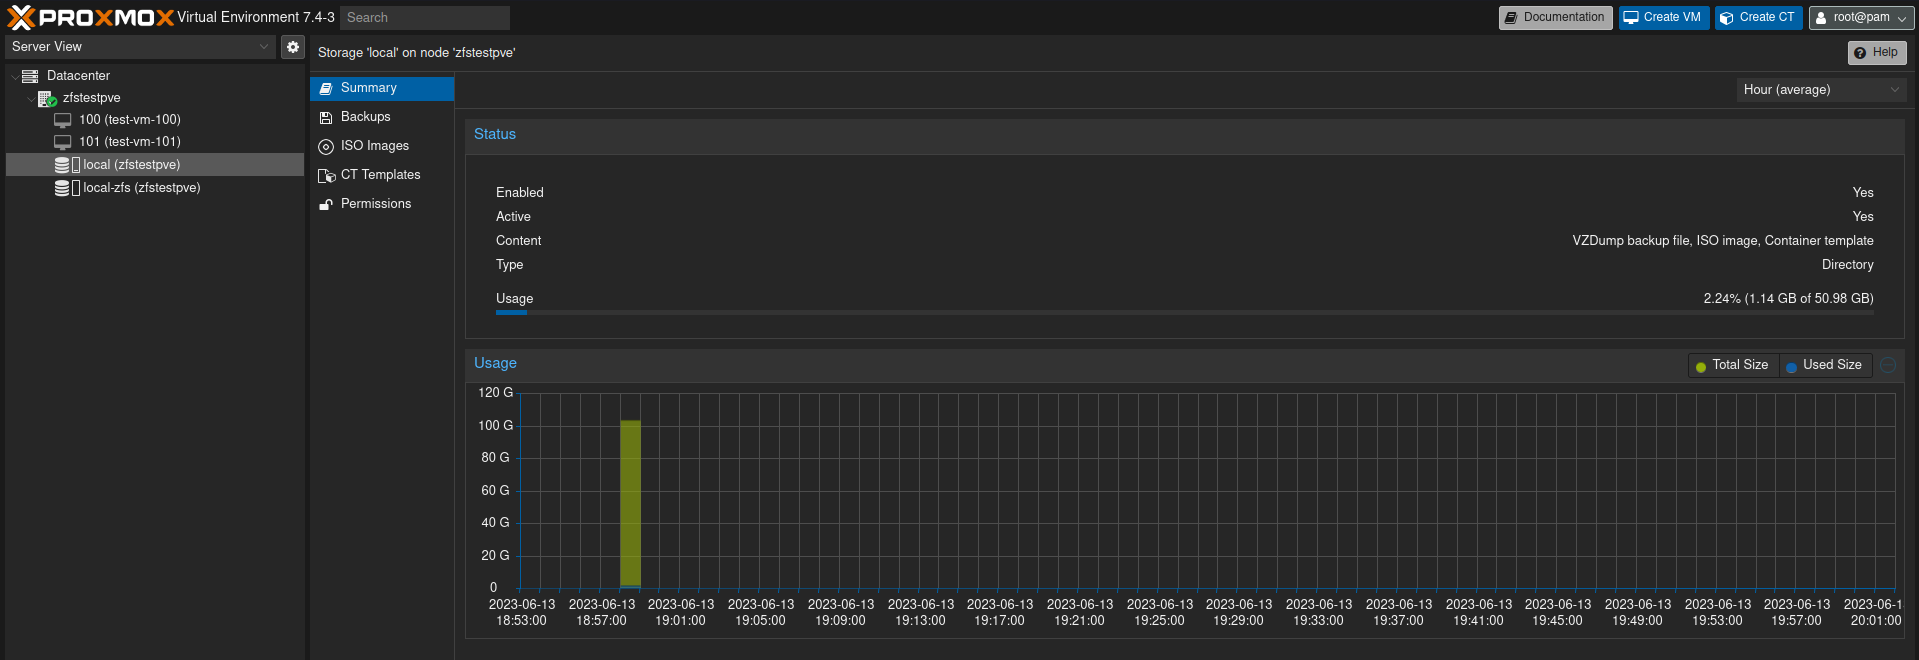
We have successfully migrated our Proxmox ZFS installation to a new smaller disk. 🙂

Recent Comments