• About Binary Impulse
  • BashBytes
Binary Impulse

Category Archives: How-to’s

Tutorials and step-by-step instructions.

Adaptec 6805T Troubleshooting Experience

August 27, 2019 1:51 AM / Leave a Comment / Kirk Schnable

I recently started building out my third file server, and picked up some Adaptec 6805T RAID cards on eBay to interface with my multiple drive trays. Having built similar servers and also working with numerous Adaptec product lines in my day to day datacenter work, I consider myself to be a subject matter expert, but this experience seemed interesting enough to write a post about since the issue had me scratching my head for a bit, hopefully this will help someone who is in my shoes in the future.

An Unusual Error

One of the cards out of the batch was producing an unusual error.

One or more drives are either missing or not responding.
Please check if the drives are connected and powered on.
<<<< FATAL CONFIGURATION ERROR DETECTED >>>>
<<<< CANNOT CONTINUE BOOT PROCESS >>>>
<< Correct the problem and Reboot the system >>

On the surface, this error makes a lot of sense, it’s simply warning that the hard drives from the previous configuration are gone. Since I bought this card on eBay, and there’s no telling what the previous owner’s configuration was, this makes perfect sense.

What doesn’t make sense is this error message halting the boot process, and the lack of ability to accept this new configuration state. Normally, you would be prompted to accept or reject the new configuration when drives are removed.

What makes even LESS sense is the complete absence of any documentation or other posts online containing the text of this error. My Google searches returned nothing of use. No mention of this on any Adaptec resources I could find. No one on /r/homelab able to provide a helpful response to my post.

Troubleshooting Efforts

Troubleshooting this problem was difficult, because my computer would not boot with the PCIe card installed. This error message completely halted the boot process. Since PCIe isn’t hot plug, it’s not as if I could turn the computer on and then slide the card in.

I remembered that I have a few server boards which allow me the capability of disabling the PCIe option ROMs on a per-port basis, so my hope was that I could disable the oprom on the card and boot into Linux, then do further troubleshooting with arcconf.

So, I popped the card in and went to go into the BIOS, but of course, thanks to this error, I couldn’t even open the BIOS. The ROM initialization happened before the BIOS opened and thus locked up my system and I wasn’t able to proceed further.

I decided to put a working 6805T card in, disable the option ROM, then swap the card for the non-working one and hope that the ROM would stay disabled in the BIOS.

This worked, and I was able to get booted into Linux!

Trial & Error

Poking around arcconf I had a few ideas.

I tried resetting the controller to factory defaults:
arcconf setconfig 1 default

Curiously, this alone did NOT fix the problem.

Reading the docs, I came across this command, and I was VERY hopeful:
arcconf setbiosparams 1 BIOSHALTONMISSINGDRIVECOUNT <count>

But unfortunately, apparently my controller doesn’t “support” changing this setting?
Setting the BIOS parameters in not supported on this controller.
This was definitely a letdown, as this seemed like the setting I wanted to change.

What Ended Up Working

I decided, since the firmware on the controller was outdated, I would update the firmware, try to reset as much as possible, and then test it.

So I downloaded the latest BIOS ROM image from Adaptec and proceeded:

arcconf romupdate 1 as680T01.ufi
arcconf setconfig 1 default
arcconf resetstatisticscounters 1

This worked! I was now able to boot into the Adaptec BIOS with the CTRL+A prompt, after moving the card to a PCIe slot where the option ROM was enabled.

Curiously, even after resetting everything, I STILL had to “accept” the new configuration the first time. But, after this, everything was working normally! 🙂

Posted in: How-To's, Musings

Monitoring & Graphing Eldewrito Server Statistics In LibreNMS

December 14, 2018 10:13 PM / Leave a Comment / Kirk Schnable

Introduction
LibreNMS is a fantastic open source NMS which I have been using for some time to monitor statistics on my network devices and servers.  The SNMP-based monitoring it offers is very simple to set up and provides fantastic insights into a variety of devices.

I recently spun up some Halo Online \ Eldewrito servers and wanted to keep track of the performance of the servers, so I could know the capacity of my VM hypervisor which I dedicated to the project.  My first step was configuring LibreNMS and monitoring the basic server statistics, but I really wanted to take this a step further, and correlate that data to the player count on the server.  Since Eldewrito is a community based game, a lot of tools are very limited, so tools such as GameTracker aren’t supportive of the game.

Fortunately, Eldewrito has a very simple query port usage and returns simple JSON data, so I was off to figuring out how to get this done.

The Approach
After consulting with some LibreNMS community members on their Discord, it was pointed out to me that LibreNMS supports Nagios plugins, so I got to work writing my own.

My Nagios Plugin
I have published the code for my Nagios plugin on Github.  The repository can be found here, and a direct link to the plugin file here.

If you are setting this up, download the plugin file, and proceed with this article.

LibreNMS Nagios Plugin Setup
LibreNMS provides excellent documentation on how to set up Nagios plugin support, you can find it here.  I am not going to cover this entire setup here, only the parts necessary to get this plugin working.  If you aren’t going to use other Nagios plugins, you don’t need to follow the rest of their guide’s steps either, but it’s there for your reference if the configuration steps change down the road.

The only steps which were required for the setup I wanted were:

  • Update the LibreNMS config.php, add the following lines:
$config['show_services']           = 1;
$config['nagios_plugins']   = "/usr/lib/nagios/plugins";
  • Create the Nagios plugins directory:
mkdir -p /usr/lib/nagios/plugins/
  • Place my plugin file (found in the above section) in this directory.
  • Make the plugin file executable:
chmod +x /usr/lib/nagios/plugins/check_eldewrito
  • Your LibreNMS cron in /etc/cron.d/librenms needs a line which is checking the services.  Mine had this line already, so I didn’t need to change anything.  If yours doesn’t, you could try adding mine or consult the LibreNMS documentation above.
*/5  *    * * *   librenms    /opt/librenms/check-services.php >> /dev/null 2>&1

Set Up Your Monitor!
Now that you’ve done the above, LibreNMS should display a Services tab at the top.  Navigate there to add a new service monitor.

On this tab, your next step is filling in the details for the plugin to work.

You will need to know the IP address of your Eldewrito server, as well as the query port.  The default query port is 11775.

Enter the following options:

  • Device – Choose the server which you are hosting the Eldewrito server on.
  • Type  – Select check_eldewrito to use our script.  This should be the filename of the file you put in your plugins folder, if you changed it.
  • Description – Enter whatever you please here, I don’t care. 🙂
  • IP Address – Can be left blank and LibreNMS will autofill the device’s IP, or you can type the device’s IP if you enjoy verbosity like I do.
  • Parameters – Just enter the query port of the Eldewrito server here, default is 11775.

Locating The Graph & Data
Once you’ve set up your first service monitor, go grab a cup of coffee or some dinner.  Allow at least 5-10 minutes for the graphing to start.

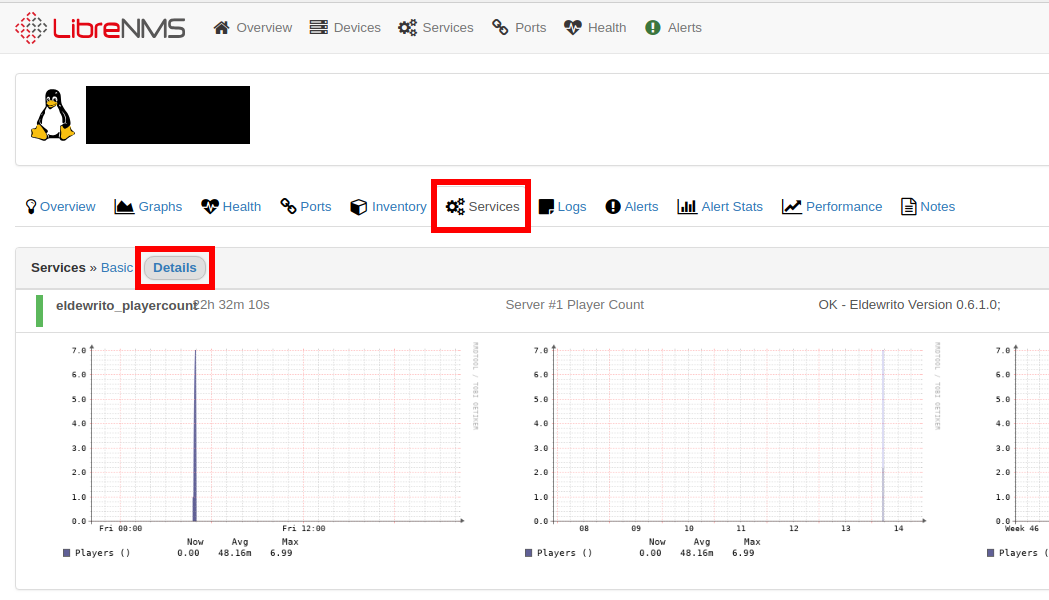
The graph is located under the Services tab, you can either click on the device and go to its services tab, or you can go to the services tab on the top and click “All Services”.  You’ll need to toggle the tab from Basic to Detailed as well to see the graph.

Unfortunately on my version of LibreNMS there are some styling issues, the last check time overlaps the plugin check name a bit.  Maybe they will correct this in a future update, it is mostly a cosmetic issue anyway.

There you have it!  You can add this plugin on multiple server devices in LibreNMS, or use it on the same server several times across multiple ports.  The possibilities are quite endless!  It’s possible to extend the plugin to gather other statistics from the server as well, but for the moment, player count was of the most interest to me.

Please feel free to leave a comment here or open an issue on the Github if you run into any questions or problems with the plugin, and I’ll be happy to take a look.

Posted in: How-To's, Musings

Reinstall GRUB When Your System Isn’t Bootable

April 4, 2016 4:22 AM / Leave a Comment / Kirk Schnable

Background
From time to time, I have encountered a system where due to some conditions the GRUB installation has become corrupted.  It is a fairly simple matter to reinstall GRUB, and sometimes this can quickly salvage a broken installation.

This is not meant to be a comprehensive guide, but is a compilation of information I found online ([1], [2]) that was useful to me in repairing a few problematic GRUB loaders.  Please feel free to contribute in the comments section if you have something to add.

Setting Up The Environment
The first thing you will want to do is locate a live CD as close to the version of Linux you have installed as possible.  Boot into the Live CD.

You need to set up a functional chroot.  For the purposes of this guide, I will assume /dev/sda1 is your / partition on your installation.  We will make a chroot in /mnt/chroot/.

mkdir /mnt/chroot/
mount /dev/sda1 /mnt/chroot/

Next, you need to bind the directories that GRUB needs to access.

mount --bind /dev /mnt/chroot/dev
mount --bind /dev/pts /mnt/chroot/dev/pts
mount --bind /proc /mnt/chroot/proc
mount --bind /sys /mnt/chroot/sys

Finally, chroot to your environment.

chroot /mnt/chroot/

Reinstalling GRUB Automatically
You can try a simple reinstall of GRUB automatically first, see if any insightful errors are produced.

grub-install /dev/sda

Failing that, try the following which will rescan the BIOS drives and update information in the GRUB configuration.

grub-install --recheck /dev/sda

Reinstalling GRUB Manually
If the automatic reinstall does not work for you, try reinstalling via the GRUB shell.

grub
grub> root(hd0,0)
grub> setup(hd0)
grub> quit
Posted in: How-To's, Musings

How To Easily Create A DVD From Just About Any Video Format (Linux CLI)

February 25, 2016 4:05 AM / 3 Comments / Kirk Schnable

Background
Encoding DVDs seems to be a task which is often overcomplicated.  If you have a video file you would like to convert into a DVD, it turns out it is very easy to do it from the Linux command line.

I was looking for a quick way to encode video to DVD, and I found this fantastic post by vmiimu on the ffmpeg forum. His post was fantastic and gave me the basis to create this guide, so props to vmiimu!  I thought the post was a bit crowded and might be difficult for some people to follow, so I have distilled its essence into this post.

This guide will allow you to convert a wide variety of common video formats into a video DVD.  The scope of this guide is to encode 1 video to 1 DVD with no menu.   The source file can be much larger than a DVD, it will be reduced in size automatically.

Prerequisites
For this guide, you will need the following programs \ commands available.  You may need to install the package from your distribution’s package library.

  • ffmpeg (usually available as a package called ‘ffmpeg‘).
  • dvdauthor (usually available as the package ‘dvdauthor‘)
  • genisoimage (usually available as the package ‘genisoimage‘)
  • growisofs (usually available in the package ‘dvd+rw-tools‘)

Installing these programs is beyond the scope of this guide.  You are assumed to already have them installed.

Hint: If you are using a Red Hat based distro, you may need EPEL and NUX Desktop.

Filenames & Paths Used In This Guide
For ease of understanding, I will be using the following filenames in this guide.  Please substitute your own filenames as you choose.
source.mkv – The original source video file you want to burn to DVD.  This is the only file you must supply, the rest will be created.
temp.mpg – The mpeg encoded video file which will be actually burned to DVD.
dvdmovie – The directory which will store your DVD files during encoding (AUDIO_TS, VIDEO_TS)
dvd.iso – The final .ISO image which you will burn to your DVD.
/dev/dvd – The device path for your DVD burner.


The Process:
Convert the source video to an MPEG video file <4.7GB.
(This may take a long time, and is the most CPU intensive part of the process.)

For videos with 4:3 aspect ratio, use this command:

ffmpeg -i source.mkv -filter:v "scale='if(gt(a,720/480),720,-1)':'if(gt(a,720/480),-1,480)',pad=w=720:h=480:x=(ow-iw)/2:y=(oh-ih)/2" -target ntsc-dvd temp.mpg

For videos with 16:9 (widescreen) aspect ratio, use this command:

ffmpeg -i source.mkv -filter:v "scale='if(gt(a,720/480),720,-1)':'if(gt(a,720/480),-1,480)',pad=w=720:h=480:x=(ow-iw)/2:y=(oh-ih)/2" -aspect 16:9 -target ntsc-dvd temp.mpg

Assemble a DVD file structure.

export VIDEO_FORMAT=NTSC
dvdauthor --title -o dvdmovie -f temp.mpg
dvdauthor -T -o dvdmovie

Generate an ISO image file.

genisoimage -dvd-video -o dvd.iso dvdmovie

Burn the ISO to a DVD disk.
Now would be a good time to insert your blank DVD.

growisofs -dvd-compat -Z /dev/dvd=dvd.iso

That’s It!
Hopefully that went smoothly for you.  Please feel free to post in the comments section if you have any questions or suggestions for improvement of this guide.

Posted in: How-To's

Installing Munin Node on XenServer 6.5

June 17, 2015 7:32 PM / Leave a Comment / Kirk Schnable

I recently was working with XenServer 6.5 and I wanted to install a Munin Node for graphing system vitals.

Getting Yum working properly to do the install required a bit of Googling, so I wanted to document these commands in case this is helpful to anyone else.

First, you’ll need to install the EPEL repository:

yum --enablerepo=extras install epel-release

Then, you’ll need to install munin-node using both base and epel repositories.

yum --enablerepo=epel --enablerepo=base install munin-node

If you are monitoring with a remote Munin server, don’t forget to add an allow rule in /etc/munin/munin-node.conf, using your favorite text editor.

You can put it somewhere by this line:

allow ^127\.0\.0\.1$

Do not fear the regex, that rule allows connections from “127.0.0.1”.  Just replace the digits and leave the other characters alone, and you can use this regex to allow any IPv4 address easily.

Now, we want to go ahead and add the Munin Node to the system startup, and start the process.

chkconfig munin-node on
service munin-node start

Don’t forget to allow incoming port 4949 TCP in your firewall if you are using a remote server to monitor the connections.  Munin shouldn’t talk to unauthorized IPs, but it wouldn’t hurt to only allow connections from the Munin server on that port.  That will not be covered in the scope of this guide, as I don’t know what firewall solution you are using.

Of course, the last step is to add the node in your /etc/munin/munin.conf on your monitoring server.  That config would look something like this, where 123.45.67.89 is your Xen server.

[xen1.myawesomexenstuff.com]
address 123.45.67.89 
use_node_name yes

From here, I assume you know the drill with Munin, the server should appear on your HTML pages in 5-10 minutes.  If you’re impatient, you can nudge the cron job that does this by running this:

su munin --shell /bin/sh --command munin-cron

Have fun!  As always, please feel free to post any questions you have in the comments section, and I will do my best to assist.

Posted in: How-To's

Post Navigation

← Older Posts
Newer Posts →

Pages

  • About Binary Impulse
  • BashBytes

Recent Posts

  • My UBook X Linux Tablet Adventure and how I learned more than I ever thought I would need to know about accelerometer drivers
  • Migrating Proxmox Hypervisor’s Boot Volume ZFS Mirror To New (Smaller) Disks
  • OPNsense Performance Tuning for Multi-Gigabit Internet
  • Reddit Deplatforms Popular Microsoft Software Swap Subreddit
  • Comcast Upgrades Gigabit Pro from 3Gbps to 6Gbps!
May 2025
M T W T F S S
 1234
567891011
12131415161718
19202122232425
262728293031  
« Apr    

Recent Comments

  • jasonistre on OPNsense Performance Tuning for Multi-Gigabit Internet
  • Nick on OPNsense Performance Tuning for Multi-Gigabit Internet
  • Kirk Schnable on OPNsense Performance Tuning for Multi-Gigabit Internet
  • nick on OPNsense Performance Tuning for Multi-Gigabit Internet
  • Eric on My UBook X Linux Tablet Adventure and how I learned more than I ever thought I would need to know about accelerometer drivers

Categories

  • How-To's
  • Humorous
  • Musings
  • Newsworthy
  • Other

Meta

  • Register
  • Log in
  • Entries feed
  • Comments feed
  • WordPress.org
© Copyright 2025 - Binary Impulse
Infinity Theme by DesignCoral / WordPress