CKEditor 5 is a WYSIWYG text editor that can be used for a variety of purposes, from creating your own Google Docs type of site to creating your own WordPress knock-off platform.
I recently wanted to use this editor, but was disappointed with the lack of features in the default builds. It doesn’t even have underlining. Evidently the official stance of the developers is that you should build your own and they won’t provide a full build anymore like they did for CKEditor 4.
CKEditor provides some detailed build instructions on their documentation, but as someone who is not a Javascript developer and has never used Node before, I found the process a bit intimidating at first. So I am writing this guide up for my own future reference when I need to update my build, and also to hopefully help someone else who is in the same situation by explaining what I feel isn’t well explained to someone who’s completely new to NPM.
The Basics – Starting Your Build
First you will need NPM installed as well as Yarn. For me on Debian 10 the package name for Yarn was not immediately intuitive and the command was different than just “yarn”.
On Debian 10 my dependencies were:# apt-get install npm yarnpkg git
Once these are installed you can simply clone the Git repository. I didn’t plan on keeping this server long term so I’m just doing it the lazy way on to a temporary VM I am going to delete when I have my final build. This isn’t the best way if you are developing your own stuff, but if you are like me and you just want a build that CKEditor won’t provide, you can just use a temp environment on a throwaway VM like I did. I had no desire to junk up my live server or even my desktop with all this NPM stuff I will not likely use again anytime soon.
For the purposes of this project I am starting with a “Classic” editor as that’s closest to what I want.
# git clone -b stable https://github.com/ckeditor/ckeditor5-build-classic.git
# cd ckeditor5-build-classic
# git remote add upstream https://github.com/ckeditor/ckeditor5-build-classic.git
Finding The Plugins You Want
The plugins you want can all be located on this page of the official documentation. I simply went through each option on the sidebar to see which plugins I might want.
Some of these are already included in the build, which you can discern by reading the build file located in src/ckeditor.js on your VM.
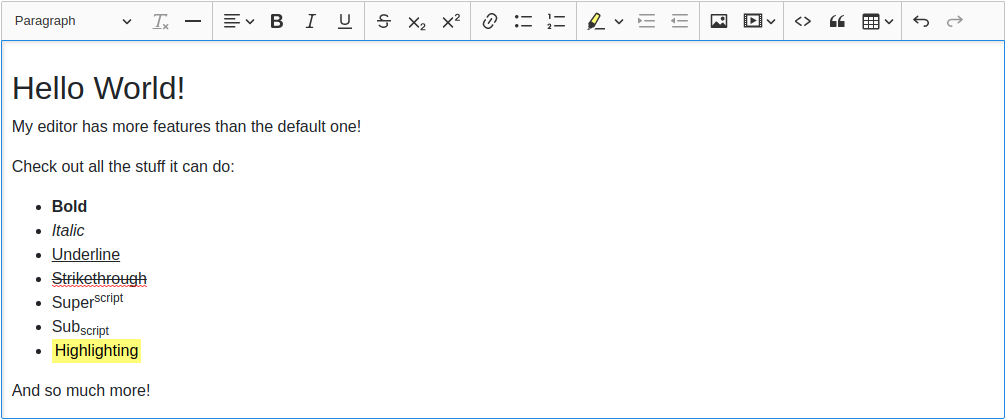
For the purposes of my build, I am adding Alignment, Strikethrough, Underline, Subscript, Superscript, Code, Highlight, HorizontalLine, RemoveFormat, Base64UploadAdapter, and ImageResize.
Installing Plugins
To install your desired plugin, there are 3 steps.
- Install the NPM package. The directions for this are provided on the plugin page on the documentation. Here are the NPM installs I ran to install the plugins I wanted:
# npm install --save @ckeditor/ckeditor5-alignment
# npm install --save @ckeditor/ckeditor5-highlight
# npm install --save @ckeditor/ckeditor5-horizontal-line
# npm install --save @ckeditor/ckeditor5-remove-format
# npm install --save @ckeditor/ckeditor5-upload
At a glance, you might notice these plugins do not match what I stated I wanted to add above. This is because you may see that some plugins contain several features, not all of which must be imported. For example, Base64UploadAdapter is one feature of ckeditor5-upload, there are other features which I haven’t imported such as SimpleUploadAdapter.
You can discern which features are part of which plugin from the plugin’s documentation page. Each one has a link to a page containing more information about the feature.
- Edit src/ckeditor.js to contain an import line for each plugin feature that you wish to import. For the purposes of my build, I added these import lines below the default ones.
import Alignment from '@ckeditor/ckeditor5-alignment/src/alignment'
import Strikethrough from '@ckeditor/ckeditor5-basic-styles/src/strikethrough';
import Underline from '@ckeditor/ckeditor5-basic-styles/src/underline';
import Subscript from '@ckeditor/ckeditor5-basic-styles/src/subscript';
import Superscript from '@ckeditor/ckeditor5-basic-styles/src/superscript';
import Code from '@ckeditor/ckeditor5-basic-styles/src/code';
import Highlight from '@ckeditor/ckeditor5-highlight/src/highlight';
import HorizontalLine from '@ckeditor/ckeditor5-horizontal-line/src/horizontalline';
import RemoveFormat from '@ckeditor/ckeditor5-remove-format/src/removeformat';
import Base64UploadAdapter from '@ckeditor/ckeditor5-upload/src/adapters/base64uploadadapter';
import ImageResize from '@ckeditor/ckeditor5-image/src/imageresize';
As a newbie to NPM, I wasn’t 100% sure how to determine exactly what should go here at first. Since I for example ran “npm install –save @ckeditor/ckeditor5-upload” how do I determine the remainder of the string to import the feature?
The best way I found is to click through to the GitHub page for the plugin, and navigate into the “src” folder. There, you will see .js files, and you simply need to put the path to the .js file, minus the extension.
- Add a line for each plugin in the ClassicEditor.builtinPlugins section of src/ckeditor.js. Unless you do this the plugin won’t actually be built into your build, which afterall is the goal.
Once again, I came across some ambiguity here. Where do the names of the plugins come from and how can I make sure I have the capitazliation correct and everything?
I copied the exact name as displayed on the documentation page for the plugin, it seemed to work correctly 100% of the time.
Some caution is needed here as some plugins contain dashes in the NPM package but the plugin itself doesn’t contain a dash. For example “@ckeditor/ckeditor5-horizontal-line” the plugin name is “HorizontalLine”.
On the Horizontal Line page of documentation, it says “See the Horizontal line feature guide and the HorizontalLine plugin documentation.” This is where I was sourcing my exact spellings and it was working reliably.
Here’s what my additional lines looked like:
        Alignment,
        Strikethrough,
        Underline,
        Subscript,
        Superscript,
        Code,
        Highlight,
        HorizontalLine,
        RemoveFormat,
        Base64UploadAdapter,
ImageResize,- Add your desired plugin to the “toolbar:” section of the ClassicEditor.defaultConfig in src/ckeditor.js.
Once again some ambiguity here. I used the lowercase version of the plugin name from the section above in step 3. This seemed to work 100% of the time.
By the way, you can use the pipe ‘|’, in the toolbar section to add spacers to the toolbar.
I moved some stuff around so here is what my whole toolbar section ended up looking like:
        toolbar: {
                items: [
                        'heading',
                        'removeformat',
                        'horizontalline',
                        '|',
                        'alignment',
                        'bold',
                        'italic',
                        'underline',
                        '|',
                        'strikethrough',
                        'subscript',
                        'superscript',
                        '|',
                        'link',
                        'bulletedList',
                        'numberedList',
                        '|',
                        'highlight',
                        'indent',
                        'outdent',
                        '|',
                        'imageUpload',
                        'mediaEmbed',
                        '|',
                        'code',
                        'blockQuote',
                        'insertTable',
                        '|',
                        'undo',
                        'redo'
                ]
        },
A Note About Some Dumb (In My Opinion) Defaults
CKEditor comes bundled with a few things which I removed for the purposes of my build.
Firstly it comes bundled with CKFinder and its associated UploadAdapter. Are far as I can tell, this does not function without a server side script I don’t care to invest time investigating, so I’m removing these from my build.
Additionally I am removing EasyImage because I have no plans to use cloud services.
To remove these items, I’m simply commenting the imports out and the plugin declarations in builtinPlugins in my src/ckeditor.js before finishing my build.
Out of the box, the image upload features of the editor do not work unless you put in some elbow grease. For now I am implementing Base64 image uploading so I don’t have to mess with a server side handler and filesystem permissions issues that can come along with uploading files. We’ll see how this works for me in my use case long term, I may switch to the Simple Upload Adapter and write a server side handler in the future.
I personally think CK Editor should just include the Base64 uploader by default so that the features work out of the box instead of this CKFinder plugin that doesn’t work without additional dependencies.
Finishing Your Build
Once you have added all of the customizations to your build, you can compile it with the Yarn tool you installed.
Although the official documentation suggests the command is “yarn”, on my Debian 10 system, it was “yarnpkg”.
So to finish my build I ran:
# yarnpkg build
Once it’s finished, the completed file is located in build/ckeditor.js. This file can be used as a drop-in replacement for any other downloadable build direct from CKEditor, and it should contain your new features.
I found I could run this build over and over as I refined my source file and I didn’t have any problems, it just overwrote my build file with a new one.
There ya go! I hope this guide simplifies someone’s project. 🙂


Recent Comments