• About Binary Impulse
  • BashBytes
Binary Impulse

Monthly Archives: September 2013

You are browsing the site archives by month.

Running Wolfenstein Enemy Territory At Native 1920×1080 Resolution (on Windows)

September 21, 2013 12:08 PM / 12 Comments / Kirk Schnable

A lot of people I play Enemy Territory with have been contemplating switching to a version of the program called ET Legacy, and their reasoning is generally related to screen resolutions.

Wolfenstein Enemy Territory is a very old game, and the designers never conceived that it would ever be played on a 1920×1080 screen resolution, so it was never coded to have that option in the Video Settings.

That being said, you can make a few modifications to your launcher shortcut, and run Enemy Territory at true native 1920×1080 resolution.

Note: The only glitch I’ve encountered with this so far, is that when you’re changing video settings in the game, the game will not revert back to 1920×1080 without a game restart after a settings change (such as texture quality, dynamic lighting, etc changes).  So, go set your quality levels for textures and everything prior to modifying your shortcut, then you should avoid encountering any of those issues.

Linux\Mac: You can use similar command switches on Linux or Mac to achieve this goal, but the process of editing the shortcut\launcher may vary.

Right click your Enemy Territory shortcut, and hit Properties.

et-icon


You’ll want to add these options to your shortcut:
(com_hunkmegs is not related to the video settings, but a few extra hunkmegs will help your game performance.)

+r_mode "-1" +r_customwidth "1920" +r_customheight "1080" +cg_fov "115" +set com_hunkmegs "768" +vid_restart

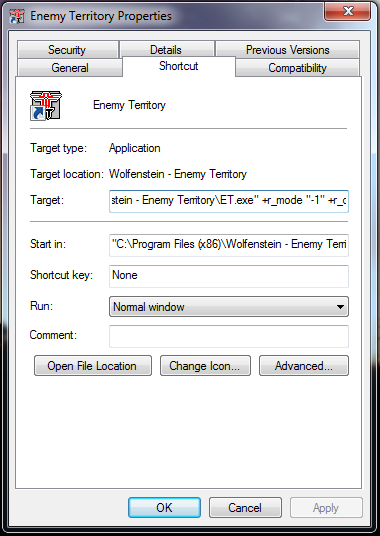
You can do so by adding them after the trailing quotation mark surrounding your program name, as show in the following screenshot:

et-settings

My full shortcut application path is as follows, since it’s not entirely visible above.  (The “Target” box above).

"C:\Program Files (x86)\Wolfenstein - Enemy Territory\ET.exe" +r_mode "-1" +r_customwidth "1920" +r_customheight "1080" +cg_fov "115" +set com_hunkmegs "768" +vid_restart

And there you have it!  Next time you launch Enemy Territory, you should be presented with a full screen 1920×1080 gaming experience.  Enjoy!


Posted in: How-To's, Musings / Tagged: Enemy Territory, FPS, Free To Play, Gaming, RTCW, Windows, Wolfenstein

Installing HP Array Configuration Utility (HP ACU) on Ubuntu

September 19, 2013 11:31 PM / 16 Comments / Kirk Schnable

Updated for 16.04.

This guide will help you get up and running with HP’s command line Array Configuration Utility (ACU) on Ubuntu.  This guide may will be especially useful if you have an HP Proliant server, or an HP P400 \ P410 RAID card or similar.

Install the HP Linux Repository

echo "deb http://downloads.linux.hpe.com/SDR/downloads/MCP/ubuntu xenial/current non-free" >> /etc/apt/sources.list.d/hp.list

Install HP Linux Repository GPG Key

wget -qO - http://downloads.linux.hpe.com/SDR/downloads/MCP/GPG-KEY-mcp | sudo apt-key add -

 Prepare For The Installation

sudo apt-get update

Install Packages

sudo apt-get install cpqacuxe hpacucli hpsmh

HP Array Configuration Utility Is Now Installed!

If you’ve never used the Array Configuration Utility before, here’s a cheat sheet for the commands you might want: http://binaryimpulse.com/2013/09/hp-array-configuration-utility-command-cheat-sheet/

I may do a write-up on some of the more useful commands at a later time.  For now, here’s what you should try to see if everything’s working.  (Along with sample output from my server.)

root@Server:~# hpacucli ctrl all show status

Smart Array P410 in Slot 3
   Controller Status: OK
   Cache Status: OK

root@Server:~# hpacucli ctrl all show config

Smart Array P410 in Slot 3                (sn: ##############  )

   array A (SATA, Unused Space: 0  MB)

      logicaldrive 1 (19.1 TB, RAID 5, OK)

      physicaldrive 1I:0:1 (port 1I:box 0:bay 1, SATA, 3 TB, OK)
      physicaldrive 1I:0:2 (port 1I:box 0:bay 2, SATA, 3 TB, OK)
      physicaldrive 1I:0:3 (port 1I:box 0:bay 3, SATA, 3 TB, OK)
      physicaldrive 1I:0:4 (port 1I:box 0:bay 4, SATA, 3 TB, OK)
      physicaldrive 2I:0:5 (port 2I:box 0:bay 5, SATA, 3 TB, OK)
      physicaldrive 2I:0:6 (port 2I:box 0:bay 6, SATA, 3 TB, OK)
      physicaldrive 2I:0:7 (port 2I:box 0:bay 7, SATA, 3 TB, OK)
      physicaldrive 2I:0:8 (port 2I:box 0:bay 8, SATA, 3 TB, OK)

   SEP (Vendor ID PMCSIERA, Model  SRC 8x6G) 250 (WWID: ##############)

root@Server:~#

I may do some subsequent write-ups on the HP Array Configuration Utility.  Please feel free to ask questions in the comments section, but please keep in mind that I’m still learning to use this tool as well.

Posted in: How-To's / Tagged: ACU, HP, hpacucli, P410, Precise, RAID, Ubuntu

HP Array Configuration Utility Command Cheat Sheet

September 19, 2013 11:28 PM / 3 Comments / Kirk Schnable

New to the HP Array Configuration Utility?  Me too, so I did some Googling and found an awesome cheat sheet.  I don’t want to steal any credit from its original authors, but I do think it should be reposted for archival.  I’d like a copy of it for my own reference, so I decided to toss it here on Binary Impulse so others might stumble across it.

Here’s the original article: http://www.datadisk.co.uk/html_docs/redhat/hpacucli.htm

Utility Keyword abbreviations
Abbreviations chassisname = ch
controller = ctrl
logicaldrive = ld
physicaldrive = pd
drivewritecache = dwc
hpacucli utility
hpacucli # hpacucli 

# hpacucli help

Note: you can use the hpacucli command in a script

Controller Commands
Display (detailed) hpacucli> ctrl all show config
hpacucli> ctrl all show config detail
Status hpacucli> ctrl all show status
Cache hpacucli> ctrl slot=0 modify dwc=disable
hpacucli> ctrl slot=0 modify dwc=enable
Rescan hpacucli> rescan 

Note: detects newly added devices since the last rescan

Physical Drive Commands
Display (detailed) hpacucli> ctrl slot=0 pd all show
hpacucli> ctrl slot=0 pd 2:3 show detail 

Note: you can obtain the slot number by displaying the controller configuration (see above)

Status hpacucli> ctrl slot=0 pd all show status
hpacucli> ctrl slot=0 pd 2:3 show status
Erase hpacucli> ctrl slot=0 pd 2:3 modify erase
Blink disk LED hpacucli> ctrl slot=0 pd 2:3 modify led=on
hpacucli> ctrl slot=0 pd 2:3 modify led=off
Logical Drive Commands
Display (detailed) hpacucli> ctrl slot=0 ld all show [detail]
hpacucli> ctrl slot=0 ld 4 show [detail]
Status hpacucli> ctrl slot=0 ld all show status
hpacucli> ctrl slot=0 ld 4 show status
Blink disk LED hpacucli> ctrl slot=0 ld 4 modify led=on
hpacucli> ctrl slot=0 ld 4 modify led=off
re-enabling failed drive hpacucli> ctrl slot=0 ld 4 modify reenable forced
Create # logical drive – one disk
hpacucli> ctrl slot=0 create type=ld drives=1:12 raid=0 

# logical drive – mirrored
hpacucli> ctrl slot=0 create type=ld drives=1:13,1:14 size=300 raid=1

# logical drive – raid 5
hpacucli> ctrl slot=0 create type=ld drives=1:13,1:14,1:15,1:16,1:17 raid=5

Note:
drives – specific drives, all drives or unassigned drives
size – size of the logical drive in MB
raid – type of raid 0, 1 , 1+0 and 5

Remove hpacucli> ctrl slot=0 ld 4 delete
Expanding hpacucli> ctrl slot=0 ld 4 add drives=2:3
Extending hpacucli> ctrl slot=0 ld 4 modify size=500 forced
Spare hpacucli> ctrl slot=0 array all add spares=1:5,1:7
Display (detailed) hpacucli> ctrl all show config
hpacucli> ctrl all show config detail
Status hpacucli> ctrl all show status
Cache hpacucli> ctrl slot=0 modify dwc=disable
hpacucli> ctrl slot=0 modify dwc=enable
Rescan hpacucli> rescan 

Note: detects newly added devices since the last rescan

Posted in: How-To's / Tagged: ACU, HP, hpacucli, P410, Precise, RAID, Ubuntu

Pages

  • About Binary Impulse
  • BashBytes

Recent Posts

  • My UBook X Linux Tablet Adventure and how I learned more than I ever thought I would need to know about accelerometer drivers
  • Migrating Proxmox Hypervisor’s Boot Volume ZFS Mirror To New (Smaller) Disks
  • OPNsense Performance Tuning for Multi-Gigabit Internet
  • Reddit Deplatforms Popular Microsoft Software Swap Subreddit
  • Comcast Upgrades Gigabit Pro from 3Gbps to 6Gbps!
September 2013
M T W T F S S
 1
2345678
9101112131415
16171819202122
23242526272829
30  
« Jul   Jun »

Recent Comments

  • jasonistre on OPNsense Performance Tuning for Multi-Gigabit Internet
  • Nick on OPNsense Performance Tuning for Multi-Gigabit Internet
  • Kirk Schnable on OPNsense Performance Tuning for Multi-Gigabit Internet
  • nick on OPNsense Performance Tuning for Multi-Gigabit Internet
  • Eric on My UBook X Linux Tablet Adventure and how I learned more than I ever thought I would need to know about accelerometer drivers

Categories

  • How-To's
  • Humorous
  • Musings
  • Newsworthy
  • Other

Meta

  • Register
  • Log in
  • Entries feed
  • Comments feed
  • WordPress.org
© Copyright 2025 - Binary Impulse
Infinity Theme by DesignCoral / WordPress