Tag Archives: Precise

Installing HP Array Configuration Utility (HP ACU) on Ubuntu

Updated for 16.04.

This guide will help you get up and running with HP’s command line Array Configuration Utility (ACU) on Ubuntu.  This guide may will be especially useful if you have an HP Proliant server, or an HP P400 \ P410 RAID card or similar.

Install the HP Linux Repository

echo "deb http://downloads.linux.hpe.com/SDR/downloads/MCP/ubuntu xenial/current non-free" >> /etc/apt/sources.list.d/hp.list

Install HP Linux Repository GPG Key

wget -qO - http://downloads.linux.hpe.com/SDR/downloads/MCP/GPG-KEY-mcp | sudo apt-key add -

 Prepare For The Installation

sudo apt-get update

Install Packages

sudo apt-get install cpqacuxe hpacucli hpsmh

HP Array Configuration Utility Is Now Installed!

If you’ve never used the Array Configuration Utility before, here’s a cheat sheet for the commands you might want: http://binaryimpulse.com/2013/09/hp-array-configuration-utility-command-cheat-sheet/

I may do a write-up on some of the more useful commands at a later time.  For now, here’s what you should try to see if everything’s working.  (Along with sample output from my server.)

root@Server:~# hpacucli ctrl all show status

Smart Array P410 in Slot 3
   Controller Status: OK
   Cache Status: OK

root@Server:~# hpacucli ctrl all show config

Smart Array P410 in Slot 3                (sn: ##############  )

   array A (SATA, Unused Space: 0  MB)

      logicaldrive 1 (19.1 TB, RAID 5, OK)

      physicaldrive 1I:0:1 (port 1I:box 0:bay 1, SATA, 3 TB, OK)
      physicaldrive 1I:0:2 (port 1I:box 0:bay 2, SATA, 3 TB, OK)
      physicaldrive 1I:0:3 (port 1I:box 0:bay 3, SATA, 3 TB, OK)
      physicaldrive 1I:0:4 (port 1I:box 0:bay 4, SATA, 3 TB, OK)
      physicaldrive 2I:0:5 (port 2I:box 0:bay 5, SATA, 3 TB, OK)
      physicaldrive 2I:0:6 (port 2I:box 0:bay 6, SATA, 3 TB, OK)
      physicaldrive 2I:0:7 (port 2I:box 0:bay 7, SATA, 3 TB, OK)
      physicaldrive 2I:0:8 (port 2I:box 0:bay 8, SATA, 3 TB, OK)

   SEP (Vendor ID PMCSIERA, Model  SRC 8x6G) 250 (WWID: ##############)

root@Server:~#

I may do some subsequent write-ups on the HP Array Configuration Utility.  Please feel free to ask questions in the comments section, but please keep in mind that I’m still learning to use this tool as well.

HP Array Configuration Utility Command Cheat Sheet

New to the HP Array Configuration Utility?  Me too, so I did some Googling and found an awesome cheat sheet.  I don’t want to steal any credit from its original authors, but I do think it should be reposted for archival.  I’d like a copy of it for my own reference, so I decided to toss it here on Binary Impulse so others might stumble across it.

Here’s the original article: http://www.datadisk.co.uk/html_docs/redhat/hpacucli.htm

Utility Keyword abbreviations
Abbreviations chassisname = ch
controller = ctrl
logicaldrive = ld
physicaldrive = pd
drivewritecache = dwc
hpacucli utility
hpacucli # hpacucli 

# hpacucli help

Note: you can use the hpacucli command in a script

Controller Commands
Display (detailed) hpacucli> ctrl all show config
hpacucli> ctrl all show config detail
Status hpacucli> ctrl all show status
Cache hpacucli> ctrl slot=0 modify dwc=disable
hpacucli> ctrl slot=0 modify dwc=enable
Rescan hpacucli> rescan 

Note: detects newly added devices since the last rescan

Physical Drive Commands
Display (detailed) hpacucli> ctrl slot=0 pd all show
hpacucli> ctrl slot=0 pd 2:3 show detail 

Note: you can obtain the slot number by displaying the controller configuration (see above)

Status hpacucli> ctrl slot=0 pd all show status
hpacucli> ctrl slot=0 pd 2:3 show status
Erase hpacucli> ctrl slot=0 pd 2:3 modify erase
Blink disk LED hpacucli> ctrl slot=0 pd 2:3 modify led=on
hpacucli> ctrl slot=0 pd 2:3 modify led=off
Logical Drive Commands
Display (detailed) hpacucli> ctrl slot=0 ld all show [detail]
hpacucli> ctrl slot=0 ld 4 show [detail]
Status hpacucli> ctrl slot=0 ld all show status
hpacucli> ctrl slot=0 ld 4 show status
Blink disk LED hpacucli> ctrl slot=0 ld 4 modify led=on
hpacucli> ctrl slot=0 ld 4 modify led=off
re-enabling failed drive hpacucli> ctrl slot=0 ld 4 modify reenable forced
Create # logical drive – one disk
hpacucli> ctrl slot=0 create type=ld drives=1:12 raid=0 

# logical drive – mirrored
hpacucli> ctrl slot=0 create type=ld drives=1:13,1:14 size=300 raid=1

# logical drive – raid 5
hpacucli> ctrl slot=0 create type=ld drives=1:13,1:14,1:15,1:16,1:17 raid=5

Note:
drives – specific drives, all drives or unassigned drives
size – size of the logical drive in MB
raid – type of raid 0, 1 , 1+0 and 5

Remove hpacucli> ctrl slot=0 ld 4 delete
Expanding hpacucli> ctrl slot=0 ld 4 add drives=2:3
Extending hpacucli> ctrl slot=0 ld 4 modify size=500 forced
Spare hpacucli> ctrl slot=0 array all add spares=1:5,1:7
Display (detailed) hpacucli> ctrl all show config
hpacucli> ctrl all show config detail
Status hpacucli> ctrl all show status
Cache hpacucli> ctrl slot=0 modify dwc=disable
hpacucli> ctrl slot=0 modify dwc=enable
Rescan hpacucli> rescan 

Note: detects newly added devices since the last rescan

Safely Removing Gnome-Keyring From Xubuntu 12.04

EDIT: Your results may vary, I am getting some feedback about this solution indicating which it may not be entirely effective, or may not work any more.

In previous Linux deployments, we have had problems with people’s keyring passwords being forgotten or not working, to the point where the universal response if you ask anyone what to do when the Gnome Keyring prompt comes up, it’s “oh, just hit cancel”.

In the latest image, we have decided to remove gnome-keyring.  You would think you would be able to do this very easily.

sudo apt-get remove gnome-keyring

But in reality, this command is dangerous, and threatens to remove xubuntu-desktop.

The following packages will be REMOVED:
  gnome-keyring oneconf python-ubuntu-sso-client seahorse software-center
  ubuntu-sso-client ubuntu-sso-client-gtk xubuntu-desktop
0 upgraded, 0 newly installed, 8 to remove and 0 not upgraded.
After this operation, 11.5 MB disk space will be freed.
Do you want to continue [Y/n]?

So, I did a bit of Googling, and I found this thread on Ask Ubuntu. They suggested installing aptitude and using aptitude to remove gnome-keyring, because they believe aptitude’s dependency tree is different.  However, this solution does not seem to work.

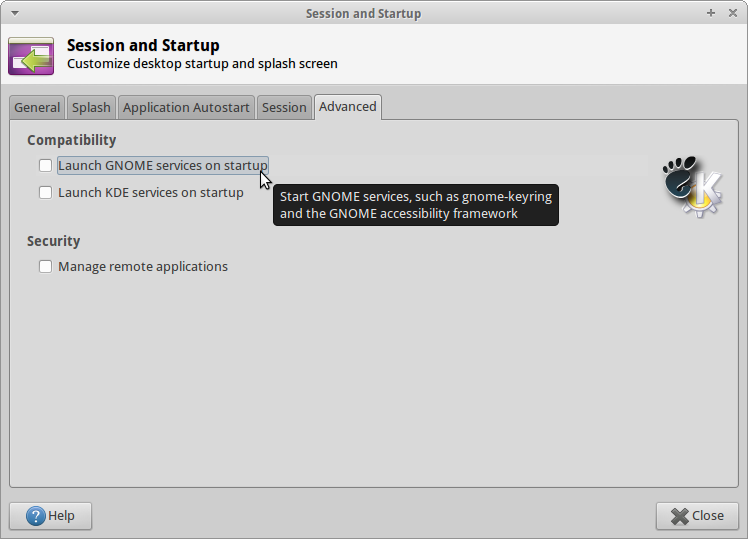
After doing some of my own digging, I found that under “Session and Startup” settings, there is an option called “Launch GNOME services on startup” listed under Compatibility.

GNOME Compatibility XFCE

Mousing over this option shows that disabling it will prevent Gnome Keyring from launching.  This will do away with our Gnome Keyring for good!