• About Binary Impulse
  • BashBytes
Binary Impulse

Monthly Archives: January 2013

You are browsing the site archives by month.

Quick and easy MSRDP script

January 30, 2013 10:06 AM / Leave a Comment / Dan

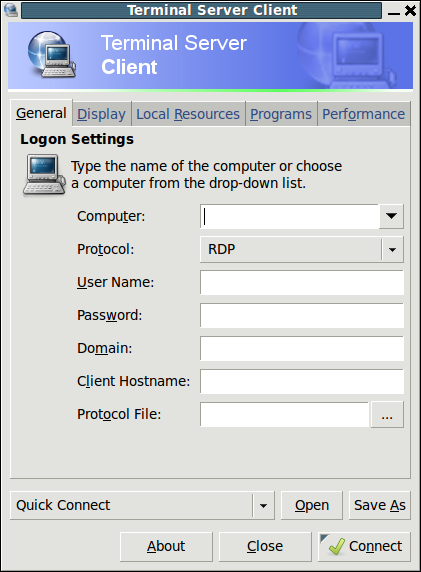
I love Linux, but as we all know we have to work on windows computers usually on a day-to-day basis.  We have servers we constantly have to RDP (remote desktop) into to work with active directory, etc.  The Terminal server client in 10.04 was all buggy and when you closed the window it would reconnect in 30 seconds.  This was especially annoying when you left a session open on your locked computer on the other side of the building and needed to hop on real quick to do something.

ubuntu-Terminal-Server-Client

I found out that the problem was that certain libraries had bee updated and caused this bug.   I decided using rdesktop for a while would suffice and created a launcher on my panel to run this command.  It wasn’t pretty for the longest time, a bash terminal asking for usernames, etc.  I really didn’t like it.  I stumbled across zenity a while ago and decided to use that to hide the password and pass that to the rdesktop command.  It is pretty simple actually.
I prefer to hard-code my username and domain in so that I don’t have to constantly fill it out, however more zenity windows could easily be added if more security or flexibility would be needed.  I saved this into a script, made it executable, and then created a launcher to run the script.  I haven’t spent much time on it but I could not just put this code into a launcher and run it (on XFCE, I suppose other frontends like gnome2 or unity might work).

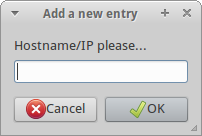
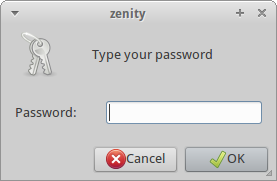
rdesktop -u <Username> -d <domain> -g 1280x1024 $(zenity --entry --text="Hostname/IP please...") -p $(zenity --password --text="Password Please...")

The code above in a launcher provides these dialogue boxes:

Username

password


Zenity provides a lot of flexibility in bash scripting so end users don’t have to see a techy/confusing bash window to do something simple.  Zenity options:

OPTIONS
       This program follows the usual  GNU  command  line  syntax,  with  long
       options starting with two dashes (`-').

       Dialog options

       --calendar
              Display calendar dialog

       --entry
              Display text entry dialog

       --error
              Display error dialog

       --file-selection
              Display file selection dialog

       --info Display info dialog

       --list Display list dialog

       --notification
              Display notification

       --progress
              Display progress indication dialog

       --question
              Display question dialog

       --text-info
              Display text information dialog

       --warning
              Display warning dialog

       --scale
              Display scale dialog

       --color-selection
              Display color selection dialog

       --password
              Display password dialog

       --forms
              Display forms dialog

We will definitely be using zenity to make some things more user friendly…

Posted in: How-To's, Musings / Tagged: bash, mstsc, rdp, script, zenity

Shattered Hard Drive

January 26, 2013 3:34 PM / Leave a Comment / Dan

I recently had a laptop brought down for not working.  It had no cosmetic issues that looked like it had dropped however the student had noticed that when the laptop was shook…  violently shook, it sounded like there was loose parts inside.  I pulled the drive out to see if I could recover any data off of it and noticed that the sound was coming from the hard drive.  I immediately knew something was very wrong and that chances of recovery were slim to none.  Told the student I would try and sent him off.

I then took the hard drive apart… and all of my years experience I have not seen this first hand yet.  The platters were shattered.

I have stripped the sound because names were mentioned.  It also took me a minute to find the screw under the sticker.

Posted in: Musings / Tagged: hard drivem, harddrive, hdd, shattered

WAN Load Balancing

January 26, 2013 1:23 PM / Leave a Comment / Dan

We ran into an issue at work where we needed faster Internet (or more bandwidth,)…  The prices for our current ISP’s were higher than we had hoped for faster Internet, but we would like fail over as well as additional load balancing.  With teachers and students depending on the Internet so much we cannot afford not to have the Internet working well.  Our current provider’s downtime was unrealistically low (single digit hours a year) and we were VERY happy with the service.  Increasing our speed with that provider was not very cost beneficial compared to other providers.  So we started considering load balancing/fail-over with a second or third provider.

We investigated several commercial options as well as potential open source options.  We LOVE open source but something as critical as this we wouldn’t want to have to ever really troubleshoot.  We looked at solutions that were computers with specialty designed OS’s, as well as specialty hardware.

We had discussed deeply whether a standard computer hardware (with replaceable hardware) would be better than a hardware device designed to do what we wanted.  Ultimately we came to the conclusion that the software or features would make the decision.

We ended up going with a Ecessa Powerlink 600 which is a load balancer for both inbound and outbound connections,WAN fail-over, and Ecessa fail-over if two units are purchased.  We get the device setup with our current single 11Mb/11Mb fiber connection and were dieing to get more connections on the device.  A few weeks later we were able to get 100Mb/5Mb cable connection in and immediately saw the differences and how Ecessa was load balancing between the two connections.  Within the first week we had also had notices of our new cable modem dropping in and out however end user experience was not effected.

We were able to eventually load balance:

  • 11Mb down/11Mb up extremely reliable but expensive fiber connection
  • 50Mb down/50Mb up reliable wireless connection
  • 100Mb down/5Mb up least reliable cable connection

This provides us with a total usable bandwidth of 161Mb down/67Mb up, with the fastest potential download speed of 100Mb down, 50Mb up depending on the WAN interface you happen to fall on.  This also provides fail-over on any of the connections so that we can immediately fail-over to another connection without major interruption to end-users.

This link is also capable of load balancing incoming connections if set to an authoritative DNS server however we are currently not implementing that due to current network structure and time involved to implement that.  Although the time is not much, we are pressed to finish other projects right now.  That being said, we will be implementing this in the future.

I can say that installation was EXTREMELY easy with tech support.  Without the tech support the device would not be as straight forward as most would hope, advanced users ‘could’ struggle to get it setup.  We provided some simple information and they sent us a configuration file which was uploaded to the device.  They pretty well configured the device remotely and sent us the file.

We got it up and running and it has been running fantastic for over 100 days; even during ISP failures on our cable modem.  Our end users do not notice any issues when we fail-over.

When you setup Ecessa WAN links you type in the IP’s of 3 hosts to ping continuously.  When 2 of them fail the PL600 fails that link until they come back.  This ensures a good solid reliable connection for the end users.  We see out links during the day sporadically fail-over from time to time and have not had any complaints from end users.

During troubleshooting we can VERY easily see what WAN links are up and down, if there were problems, and what speeds are.  Screenshot - 01152013 - 09:30:12 PM


Jan 15 21:04:06 PowerLink PL600_00250725: Web authentication succeeded for root from ::ffff:68.190.160.87
Jan 15 19:11:05 PowerLink PL600_00250725: Web authentication succeeded for root from ::ffff:68.190.160.87
Jan 14 15:02:28 PowerLink PL600_00250725: Link Link3: Testpoint #1: Status change: PASS
Jan 14 15:02:12 PowerLink PL600_00250725: Link Link3: Testpoint #1: Status change: FAIL
Jan 14 14:43:17 PowerLink PL600_00250725: Link Link3: Testpoint #3: Status change: PASS
Jan 14 14:43:00 PowerLink PL600_00250725: Link Link3: Testpoint #3: Status change: FAIL
Jan 14 14:31:08 PowerLink PL600_00250725: Link Link3: Testpoint #2: Status change: PASS
Jan 14 14:30:50 PowerLink PL600_00250725: Link Link3: Testpoint #2: Status change: FAIL
Jan 14 12:45:59 PowerLink PL600_00250725: Link Link3: Testpoint #2: Status change: PASS
Jan 14 12:45:41 PowerLink PL600_00250725: Link Link3: Testpoint #2: Status change: FAIL
Jan 14 04:33:55 PowerLink PL600_00250725: Link Link1: Testpoint #3: Status change: PASS
Jan 14 04:33:48 PowerLink PL600_00250725: Link Link1: Testpoint #1: Status change: PASS
Jan 14 04:33:46 PowerLink PL600_00250725: PowerLink refresh - done
Jan 14 04:33:46 PowerLink PL600_00250725: PowerLink refresh - status
Jan 14 04:33:46 PowerLink PL600_00250725: Link: Link1: Status change: UP
Jan 14 04:33:46 PowerLink PL600_00250725: Link Link1: Testpoint #2: Status change: PASS
Jan 14 04:33:44 PowerLink PL600_00250725: PowerLink refresh - done
Jan 14 04:33:44 PowerLink PL600_00250725: PowerLink refresh - status
Jan 14 04:33:44 PowerLink PL600_00250725: Link: Link1: Status change: DOWN
Jan 14 04:33:41 PowerLink PL600_00250725: Link Link1: Testpoint #1: Status change: FAIL

We have found the Powerlink Extremely effective and  HUGE cost savings.  In about 1 year the device will pay itself off compared to if we would purchase a very fast reliable Internet connection.  We are looking for a second to setup as a redundant fail-over in the years to come.

Posted in: Musings / Tagged: Ecessa, Networking

Linux Vinyl Plotting With A Gerber enVision Plotter

January 13, 2013 7:00 PM / Leave a Comment / Kirk Schnable

I recently had the opportunity to work with an older Gerber enVision plotter from a township.  I had major difficulties getting the old version of Omega working with their USB licensing stick, and I knew that getting anything like this working on Windows without proper licensing would be an inadvisable, and rocky road ahead.

I decided to look into open source solutions, and I found out that Inkscape can do vinyl plotting with an extension called InkCut.

This tutorial will attempt to comprehensively explain how I got this working.  I am by no means an expert, but I found very limited web resources out there on this topic, and I am hopeful that someone will eventually stumble on this article and find it useful.

Background
A simple, free, and open source solution to an expensive and complex problem: How do we plot stuff with our vinyl plotter?

Assumptions
This tutorial will assume that you have some prior experience with the Linux terminal and the Linux desktop.  On my test computer, I was working with a clean installation of Ubuntu 12.04 (12.04.1) LTS.  However, any Ubuntu or Debian flavor should be acceptable.  I am also assuming you have an older Gerber enVision series plotter.  If this is not the case, I imagine most of these instructions will apply fairly well to any kind of vinyl plotter.

The Plotter
Here are some photos of the Gerber enVision plotter I was working with.

2013-01-01 13.20.33

2013-01-01 13.20.42


The plotter interfaced with the computer using a serial connection.

Ubuntu & This Plotter
In order to establish proper communications between the computer and the plotter, I had to ensure some things were true.  I reset my plotter to the factory default settings, which resulted in a condition where I could assume this about my serial connection:

Baud: 9600
Data Length: 8
Parity: None
Stop Bit: 1

In order to ensure communication with non-root users, I took a questionable approach, and I decided to:

chmod 777 /dev/ttyS0

This did not need to be a very secure environment (we didn’t even password protect the workstation’s desktop) so I figured this would be a reasonable approach, rather than troubleshooting why CUPS was getting permission denied errors while printing to the serial port.

Configure The Plotter In CUPS
To install this plotter in CUPS, you’ll want to open up your Printer configuration area from the System menu.

Click “Add” to add a printer.

CUPS Add A Printer

If you don’t have the option for “Serial Port #1”, then use the Device URI “serial:/dev/ttyS0“.

Serial Printer


You will want to select Generic as the make of printer.

Generic Printer


Then, select “Raw Queue”  This will work with InkCut providing the HPGL instructions.

Generic Printer - Raw Queue

Obviously, it doesn’t matter what you name your plotter, or what description you give it, just give it something that makes sense.

Finalize Printer Settings

Install Inkscape

Next, we want to install Inkscape.  You can do this from Apt on Ubuntu, as such:

sudo apt-get install inkscape

Once you’re done with the installation, start Inkscape for the first time.  This will create blank default configuration folders in your profile which are necessary for the next step.

Inkscape


Then, go ahead and close Inkscape, and move on to installing InkCut!

Install InkCut
You can download the latest version of InkCut from their website.  At the time of this writing, the version is 1.0, and can be found here.

Once you’ve downloaded InkCut, go ahead and extract the file using this command.  It will put the files right where they need to be for you!

tar -xzvf InkCut-1.0.tar.gz -C ~/.config/inkscape/extensions/

Now, when you start Inkscape, you should see InkCut on the Extensions menu, under Cutter/Plotter.

InkCut

Screencast How-To’s
 I have also created some screencasts to explain how to set up the document for your plotter, as well as how to plot some basic text.

Document Setup – Screencast
(Download OGV)

Let’s Plot Some Text! – Screencast
(Download OGV)

Remember, when plotting your text, you need to make sure your objects are converted to paths, by highlighting your text and going to Path > Object To Path.  You also want to make sure your paths aren’t grouped, by right clicking each block of text and clicking Ungroup.

Then you should be good to go to Extensions > Cutter/Plotter > InkCut v1.0 and start plotting!

Posted in: How-To's, Musings / Tagged: InkCut, Inkscape, Linux, Plotter, Vinyl Cutting

Installing Zimbra Collaboration Suite On Ubuntu 12.04

January 12, 2013 9:54 PM / 20 Comments / Kirk Schnable

Background
Zimbra Collaboration Suite is a fantastic email and collaboration solution made by VMware.   Zimbra is my email server solution of choice, because it’s very easy to setup, and the features you get are unmatched by other open source email solutions.  Ubuntu 12.04 is the current Ubuntu LTS, which will be supported for servers until 2017, so this is a great time to use it on a server you don’t want to have to take offline for frequent updates, like a mail server.

How is Zimbra different from SquirrelMail or RoundCube?
Popular open source solutions for webmail are SquirrelMail and RoundCube, which interface with an existing IMAP \ SMTP server to provide webmail access.  Zimbra is a fully integrated mail solution, which sets up a POP, IMAP, and SMTP server, and provides HTTP and\or HTTPS webmail out of the box.  Zimbra also provides a desktop AJAX, desktop HTML, and mobile HTML access option set.  No matter what device you’re on, you can access your webmail in a friendly way.

Other Features of Zimbra
Zimbra offers a number of other features, such as:

  • Address Book
  • Calendar
  • Tasks Management
  • File\Document Briefcase
  • File\Document\Folder Sharing
  • Incoming Email Filtering\Antivirus
  • Social Media Integration

You can look at the official list of features, and other information, on Zimbra’s website.  This is their page on the Open Source Edition.


Installing Zimbra Collaboration Suite 8.0.2 Open Source Edition on Ubuntu 12.04
If you’ve decided that you’d like to try Zimbra Collaboration Suite, let’s get on to the installation!

Install Dependencies
These packages will be necessary for Zimbra to be installed on your system.

sudo apt-get install netcat libidn11 libpcre3 libgmp3c2 libexpat1 libstdc++6 libperl5.14 sysstat sqlite3

Download Zimbra ZCS
At the time of this writing, you can use the link in the Code box below.  As this tutorial ages, and newer versions of Zimbra are released, you will want to go to the download page and get the latest link.

wget http://files2.zimbra.com/downloads/8.0.2_GA/zcs-8.0.2_GA_5569.UBUNTU12_64.20121210115059.tgz

zcs-wget

Extract The Downloaded Archive

tar -zxvf zcs-8.0.2_GA_5569.UBUNTU12_64.20121210115059.tgz

Enter The Folder You Extracted

cd zcs-8.0.2_GA_5569.UBUNTU12_64.20121210115059

DNS Configuration
If your DNS was not setup properly, you might get an error like DNS Error resolving yourhostname.com.  There is an error which will follow regarding your MX configuration.  These errors are OK to ignore, as long as you’re not planning on using your hostname to send\receive email.  You can add properly configured domains later.

However, you do want to make sure this domain name can be resolved.  Put it in /etc/hosts for 127.0.0.1 if necessary.  If you do not do this, you will encounter an error during the final setup stage.

Run The Installer

./install.sh

Press Y and hit enter to agree to the license agreement.

ZCS-install-1


Now, if you installed all the dependencies at the start of this tutorial, you should have everything you need!

ZCS-Install-2


If you aren’t sure what you want to install, then just install the items as suggested.

zimbra-ldap – Yes
zimbra-logger – Yes
zimbra-mta – Yes
zimbra-snmp – Yes
zimbra-store – Yes
zimbra-apache – Yes
zimbra-spell  – Yes
zimbra-memcached – No
zimbra-proxy – No

When asked if you want to continue, press Y and hit enter to proceed with the installation.

ZCS-Install-3

The Zimbra installer will take care of extracting and installing the packages for you.  This part of the process might take some time, depending on the speed of your machine.


Configuration Menu
Go through all of the items on the configuration and make sure they are what you want.  I like to make sure these options are set:

Don’t stress out about the domain names too much, you can add additional domains to your email server later, very easily.

  • Common Configuration > Hostname\Ldap Master Host — Should be your server’s main domain, like mydomain.com.
  • Common Configuration > LDAP Admin Password — The administrative password for Zimbra’s LDAP Server.  Make it something you’ll remember if you ever think you’ll want to integrate anything with the built-in LDAP later.
  • LDAP > Domain To Create — Should be your server’s main domain, like mydomain.com.
  • LDAP > LDAP Root\Replication\Postfix\Amavis\Nginx\Bes Searcher Passwords — I like to change these too.
  • Zimbra Store > Admin User\Password — These will be used to login to the Zimbra Admin Area.
  • Zimbra Store > Spell Server URL — Make sure this is a web address that can be accessed, it will be used when people press Spell Check.
  • Zimbra Store > SMTP Host — Should be your server’s main domain, like mydomain.com.
  • Zimbra Store > Version Update Email Addresses — Should be an email address for an administrator.

When you’re satisfied with all of your settings, press “S” and hit enter to write your settings to the configuration file.   The default file location is fine.   Then press “A” and hit enter to apply your settings and start the server!

Zimbra will ask you to confirm the changes to your system.  Type “Yes” and hit enter.

Zimbra will now run through an installation procedure, which may take a few minutes, depending on the speed of your machine.

If all went well, Zimbra is now installed on your server.  If it didn’t, you will be given a log file location, where you can look and see what might have gone wrong.


Firewall Rules
Hopefully your server has, or is at least behind, a firewall solution.  If so, these are the ports you should definitely be unblocking for the proper use of your server.  These ports are assuming you’re running a default configuration, and you did not change your ports during the setup procedure.

Webmail: 80/tcp for standard access, 443/tcp for encrypted access.
Administration Console: 7071/tcp (can be blocked in the firewall if you only plan to do administration over VPN, locally, etc)
Aspell: 7780/tcp (Zimbra runs a spell check server on this custom port, which users will access when they press the Spell Check button on the web interface)
SMTP: 25/tcp for standard access, 465/tcp for encrypted access.
POP: 110/tcp for standard access, 995/tcp for encrypted access.
IMAP: 143/tcp for standard access, 993/tcp for encrypted access.


Accessing Your Zimbra Server
You can login to your Zimbra accounts for webmail access at your Zimbra server’s IP or DNS on the standard https port 443.  You can access your Administration Console over HTTPS using port 7071.

Point your web browser to http://your.zimbra.server.ip:7071/

Zimbra Admin Console

Once you’re logged in, your admin interface will look something like this.

Zimbra Admin 2

The Zimbra setup procedures in the web interface are very straightforward, and are up to you to play with on your own now that Zimbra is installed and working!

Posted in: How-To's / Tagged: Linux, Zimbra

Post Navigation

← Older Posts
 

Pages

  • About Binary Impulse
  • BashBytes

Recent Posts

  • My UBook X Linux Tablet Adventure and how I learned more than I ever thought I would need to know about accelerometer drivers
  • Migrating Proxmox Hypervisor’s Boot Volume ZFS Mirror To New (Smaller) Disks
  • OPNsense Performance Tuning for Multi-Gigabit Internet
  • Reddit Deplatforms Popular Microsoft Software Swap Subreddit
  • Comcast Upgrades Gigabit Pro from 3Gbps to 6Gbps!
January 2013
M T W T F S S
 123456
78910111213
14151617181920
21222324252627
28293031  
« Dec   Feb »

Recent Comments

  • jasonistre on OPNsense Performance Tuning for Multi-Gigabit Internet
  • Nick on OPNsense Performance Tuning for Multi-Gigabit Internet
  • Kirk Schnable on OPNsense Performance Tuning for Multi-Gigabit Internet
  • nick on OPNsense Performance Tuning for Multi-Gigabit Internet
  • Eric on My UBook X Linux Tablet Adventure and how I learned more than I ever thought I would need to know about accelerometer drivers

Categories

  • How-To's
  • Humorous
  • Musings
  • Newsworthy
  • Other

Meta

  • Register
  • Log in
  • Entries feed
  • Comments feed
  • WordPress.org
© Copyright 2025 - Binary Impulse
Infinity Theme by DesignCoral / WordPress