• About Binary Impulse
  • BashBytes
Binary Impulse

Category Archives: Musings

Just the musings of technical minds.

Running Wolfenstein Enemy Territory At Native 1920×1080 Resolution (on Windows)

September 21, 2013 12:08 PM / 12 Comments / Kirk Schnable

A lot of people I play Enemy Territory with have been contemplating switching to a version of the program called ET Legacy, and their reasoning is generally related to screen resolutions.

Wolfenstein Enemy Territory is a very old game, and the designers never conceived that it would ever be played on a 1920×1080 screen resolution, so it was never coded to have that option in the Video Settings.

That being said, you can make a few modifications to your launcher shortcut, and run Enemy Territory at true native 1920×1080 resolution.

Note: The only glitch I’ve encountered with this so far, is that when you’re changing video settings in the game, the game will not revert back to 1920×1080 without a game restart after a settings change (such as texture quality, dynamic lighting, etc changes).  So, go set your quality levels for textures and everything prior to modifying your shortcut, then you should avoid encountering any of those issues.

Linux\Mac: You can use similar command switches on Linux or Mac to achieve this goal, but the process of editing the shortcut\launcher may vary.

Right click your Enemy Territory shortcut, and hit Properties.

et-icon


You’ll want to add these options to your shortcut:
(com_hunkmegs is not related to the video settings, but a few extra hunkmegs will help your game performance.)

+r_mode "-1" +r_customwidth "1920" +r_customheight "1080" +cg_fov "115" +set com_hunkmegs "768" +vid_restart

You can do so by adding them after the trailing quotation mark surrounding your program name, as show in the following screenshot:

et-settings

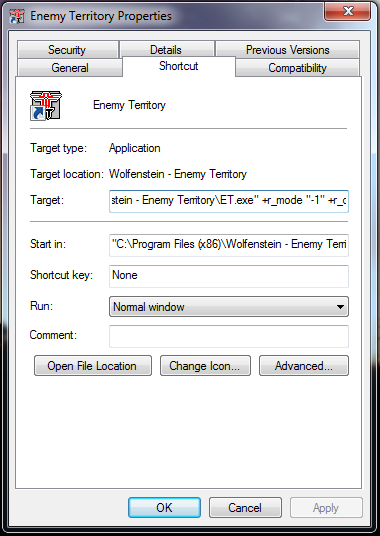
My full shortcut application path is as follows, since it’s not entirely visible above.  (The “Target” box above).

"C:\Program Files (x86)\Wolfenstein - Enemy Territory\ET.exe" +r_mode "-1" +r_customwidth "1920" +r_customheight "1080" +cg_fov "115" +set com_hunkmegs "768" +vid_restart

And there you have it!  Next time you launch Enemy Territory, you should be presented with a full screen 1920×1080 gaming experience.  Enjoy!


Posted in: How-To's, Musings / Tagged: Enemy Territory, FPS, Free To Play, Gaming, RTCW, Windows, Wolfenstein

Safely Removing Gnome-Keyring From Xubuntu 12.04

June 5, 2013 4:31 PM / 5 Comments / Kirk Schnable

EDIT: Your results may vary, I am getting some feedback about this solution indicating which it may not be entirely effective, or may not work any more.

In previous Linux deployments, we have had problems with people’s keyring passwords being forgotten or not working, to the point where the universal response if you ask anyone what to do when the Gnome Keyring prompt comes up, it’s “oh, just hit cancel”.

In the latest image, we have decided to remove gnome-keyring.  You would think you would be able to do this very easily.

sudo apt-get remove gnome-keyring

But in reality, this command is dangerous, and threatens to remove xubuntu-desktop.

The following packages will be REMOVED:
  gnome-keyring oneconf python-ubuntu-sso-client seahorse software-center
  ubuntu-sso-client ubuntu-sso-client-gtk xubuntu-desktop
0 upgraded, 0 newly installed, 8 to remove and 0 not upgraded.
After this operation, 11.5 MB disk space will be freed.
Do you want to continue [Y/n]?

So, I did a bit of Googling, and I found this thread on Ask Ubuntu. They suggested installing aptitude and using aptitude to remove gnome-keyring, because they believe aptitude’s dependency tree is different.  However, this solution does not seem to work.

After doing some of my own digging, I found that under “Session and Startup” settings, there is an option called “Launch GNOME services on startup” listed under Compatibility.

GNOME Compatibility XFCE

Mousing over this option shows that disabling it will prevent Gnome Keyring from launching.  This will do away with our Gnome Keyring for good!

Posted in: How-To's, Musings / Tagged: Gnome, gnome-keyring, Linux, Precise, XFCE, Xubuntu

Receiving RSS Updates Via Email

March 25, 2013 6:55 PM / 2 Comments / Kirk Schnable

Rss_Shiny_Icon.svg

If you’re like me, you rely on your email for everything in your life.  My email delivers my latest Facebook notifications, Nagios warnings, text messages (thanks to Google Voice), and oh I guess email too.

I have push email notifications on my mobile devices, as do a lot of people.

Some websites offer RSS feeds of information which is important to you, but don’t offer an option to receive an email.

Yes, you could set this up for any RSS feed, but this quick guide will focus on setting up email notifications for Reddit comment responses and Reddit messages.

Another interesting application for this might be to receive emails when your favorite Podcasts are updated, or if you want to get an email when your favorite blog posts a new update.

Reddit is a very real-time social website, and having instant notifications of events on Reddit could be very useful, however since Reddit doesn’t even require an email address to register, they’re not offering the functionality.


What You’ll Need:

  • An RSS feed to subscribe to.
  • An email address to send the notifications to.
  • A Linux server which is always online, which you can create cron jobs on.


Let’s Begin
This is the only part of this guide which requires root access to the server.  We will be using RSS2Email, which is a free program available for Linux.  If you are using Ubuntu, it is right in the repositories for you.

If you do not have root access to your server, but you do have SSH access, it may still be possible to use this program if you compile it yourself.  You can get the source code here.

sudo apt-get install rss2email


Setting Up RSS2Email
The setup is mind-numbingly easy!  If your email address is you@example.com, and your RSS feed link is http://www.reddit.com/message/inbox/.rss?feed=123foo456bar789&user=MyAwesomeUsername, you could use this syntax to set up your feed.

r2e new you@example.com
r2e add http://www.reddit.com/message/inbox/.rss?feed=123foo456bar789\&user=MyAwesomeUsername
r2e run

Important: Reddit RSS feeds for your Inbox, etc, have an ampersand (&) before your username.  If you do not escape this ampersand by putting a slash in front of it (\&) your feed will not work!

On The First Run, you may receive a high volume of email.  In fact, it was enough to cause my sendmail server to exceed its rate limit and throw a ton of email to the deferred queue.  But, it did eventually all send.  A lot of the first emails will be old RSS data you have already seen before.  After that, on subsequent runs, you will only receive updates.


Where Can I Find My Reddit Inbox Feed Link?
If you login to Reddit, and go to Preferences, you’ll find an “RSS Feeds” on the top of the page.  The direct link is https://ssl.reddit.com/prefs/feeds/.


Using RSS2Email
You can very easily add and delete feeds from your R2E configuration.

Add new feeds the same way you added the first one:  r2e add http://www.feedwebsite.com/feed

Delete old feeds by running r2e list, then r2e delete # where # is the number corresponding to the feed you want to delete.


Scheduling RSS2Email
Obviously, you will only receive updates when r2e is run manually.  So, an easy way to receive routine updates is to cron the command.

crontab -e

To receive updates every 10 minutes, add a line like this to your crontab.

*/10 *  * * * /usr/bin/r2e run

To receive updates every 1 minute, add a line like this to your crontab.

* *  * * * /usr/bin/r2e run


You’re Done!
You should now receive emails at your designated time intervals when the RSS feed has new updates!

Posted in: How-To's, Musings / Tagged: crontab, email, reddit, rss

Cheap spectrum analysis for wireless

February 9, 2013 2:14 PM / Leave a Comment / Dan

When I was going through college for networking I learned to hate wireless.  I had come to learn that it was insecure, unreliable, unpredictable, and difficult to troubleshoot.  I got into a job I love and then the wireless era began.  We are now implemented hundreds of new wireless network devices a year.  We have built out our infrastructure with a lot of time and planning and so far have been quite successful.  We use primarily Cisco equipment with some Ubiquiti back-hauls for some of our outdoor setups.  Cisco provides some very basic spectrum information, for someone who has done some in-depth work with wireless and Cisco this is enough information.  It doesn’t seem to provide any visual representation of the network which can be had to explain to upper management.  Spectrum analyzers can be thousands of dollars and for what we are doing we don’t need something that granular.  We need something to tell use when channels are overloaded/consumed with interference and if antenna’s are aligned properly during setup.

We bought a few Ubiquiti bridges a while back and noticed the AirOS product line has a built in spectrum analysis.  This is handy when selecting channels as it ensures you are not selecting a channel already in use.  We have been watching Ubiquiti for some time now and when we started running into some issues with our client wireless access I went out and bought a Ubiquiti Bullet M5 and an M2.  I think total for the both I paid about $140 (includes adapters and some antennas I had lying around).  As you might guess the M2 runs off of the 2.4Ghz spectrum and the M5 runs off the 5.8Ghz spectrum.  With the Bullets, a switch, and a windows laptop/netbook and power source we can easily run up and diagnose a problem.  This setup is also very mobile and could be brought out into the field to be worked on (barring a power source of course).

At this point in time I have been unsuccessful in getting the spectrum analysis software working in anything other than windows.

I am going to assume you can get the default information for the Ubiquiti Bullet and login.  My bullet is completely stock, no configuration needed to do what I will show you.  After logging in you get some beautiful throughput graphs and other good troubleshooting information.  There is also a drop down menu near the logout button which provides you with an AirView option.  AirView is the spectrum analyzer software.

Screenshot - 02092013 - 01:15:35 PM

Airview is a Java Network Launch Protocol application which obviously requires Java.  The analyzer in my virtual machine runs about 9 frames a second and shows pretty close to real time the actual spectrum.  Here is a 2.4Ghz snapshot of my work where our 2.4Ghz spectrum is very overloaded. Sadly this is with only a few clients in the area.


Screenshot - 02092013 - 01:54:43 PM

The top visual: Waterfall ViewThis is a good representation of channel utilization over time.  You can clearly see if a client is connected and on what channel.

The middle visual: Waveform View
This is a good visual of how often you get a signal at a certain power or signal strength.

The bottom view:  Real-time View
This is good for seeing what is happening right this second compared to the average and maximum power levels recorded.  After letting this run for a few minutes you can compare spikes and hopefully identify any problems.

I plan on using these to make future recommendations to clients and potential trend information over a period of time.  This could help identify possible interferers that could be as simple and intermittent as a microwave.  These pictures will be invaluable when trying to explain to upper management how or why we are having problems, and what should be done to correct it.


Posted in: How-To's, Musings / Tagged: analysis, cheap, spectrum, Ubiquiti

Quick and easy MSRDP script

January 30, 2013 10:06 AM / Leave a Comment / Dan

I love Linux, but as we all know we have to work on windows computers usually on a day-to-day basis.  We have servers we constantly have to RDP (remote desktop) into to work with active directory, etc.  The Terminal server client in 10.04 was all buggy and when you closed the window it would reconnect in 30 seconds.  This was especially annoying when you left a session open on your locked computer on the other side of the building and needed to hop on real quick to do something.

ubuntu-Terminal-Server-Client

I found out that the problem was that certain libraries had bee updated and caused this bug.   I decided using rdesktop for a while would suffice and created a launcher on my panel to run this command.  It wasn’t pretty for the longest time, a bash terminal asking for usernames, etc.  I really didn’t like it.  I stumbled across zenity a while ago and decided to use that to hide the password and pass that to the rdesktop command.  It is pretty simple actually.
I prefer to hard-code my username and domain in so that I don’t have to constantly fill it out, however more zenity windows could easily be added if more security or flexibility would be needed.  I saved this into a script, made it executable, and then created a launcher to run the script.  I haven’t spent much time on it but I could not just put this code into a launcher and run it (on XFCE, I suppose other frontends like gnome2 or unity might work).

rdesktop -u <Username> -d <domain> -g 1280x1024 $(zenity --entry --text="Hostname/IP please...") -p $(zenity --password --text="Password Please...")

The code above in a launcher provides these dialogue boxes:

Username

password


Zenity provides a lot of flexibility in bash scripting so end users don’t have to see a techy/confusing bash window to do something simple.  Zenity options:

OPTIONS
       This program follows the usual  GNU  command  line  syntax,  with  long
       options starting with two dashes (`-').

       Dialog options

       --calendar
              Display calendar dialog

       --entry
              Display text entry dialog

       --error
              Display error dialog

       --file-selection
              Display file selection dialog

       --info Display info dialog

       --list Display list dialog

       --notification
              Display notification

       --progress
              Display progress indication dialog

       --question
              Display question dialog

       --text-info
              Display text information dialog

       --warning
              Display warning dialog

       --scale
              Display scale dialog

       --color-selection
              Display color selection dialog

       --password
              Display password dialog

       --forms
              Display forms dialog

We will definitely be using zenity to make some things more user friendly…

Posted in: How-To's, Musings / Tagged: bash, mstsc, rdp, script, zenity

Post Navigation

← Older Posts
Newer Posts →

Pages

  • About Binary Impulse
  • BashBytes

Recent Posts

  • My UBook X Linux Tablet Adventure and how I learned more than I ever thought I would need to know about accelerometer drivers
  • Migrating Proxmox Hypervisor’s Boot Volume ZFS Mirror To New (Smaller) Disks
  • OPNsense Performance Tuning for Multi-Gigabit Internet
  • Reddit Deplatforms Popular Microsoft Software Swap Subreddit
  • Comcast Upgrades Gigabit Pro from 3Gbps to 6Gbps!
May 2025
M T W T F S S
 1234
567891011
12131415161718
19202122232425
262728293031  
« Apr    

Recent Comments

  • jasonistre on OPNsense Performance Tuning for Multi-Gigabit Internet
  • Nick on OPNsense Performance Tuning for Multi-Gigabit Internet
  • Kirk Schnable on OPNsense Performance Tuning for Multi-Gigabit Internet
  • nick on OPNsense Performance Tuning for Multi-Gigabit Internet
  • Eric on My UBook X Linux Tablet Adventure and how I learned more than I ever thought I would need to know about accelerometer drivers

Categories

  • How-To's
  • Humorous
  • Musings
  • Newsworthy
  • Other

Meta

  • Register
  • Log in
  • Entries feed
  • Comments feed
  • WordPress.org
© Copyright 2025 - Binary Impulse
Infinity Theme by DesignCoral / WordPress